


Zoids Generations
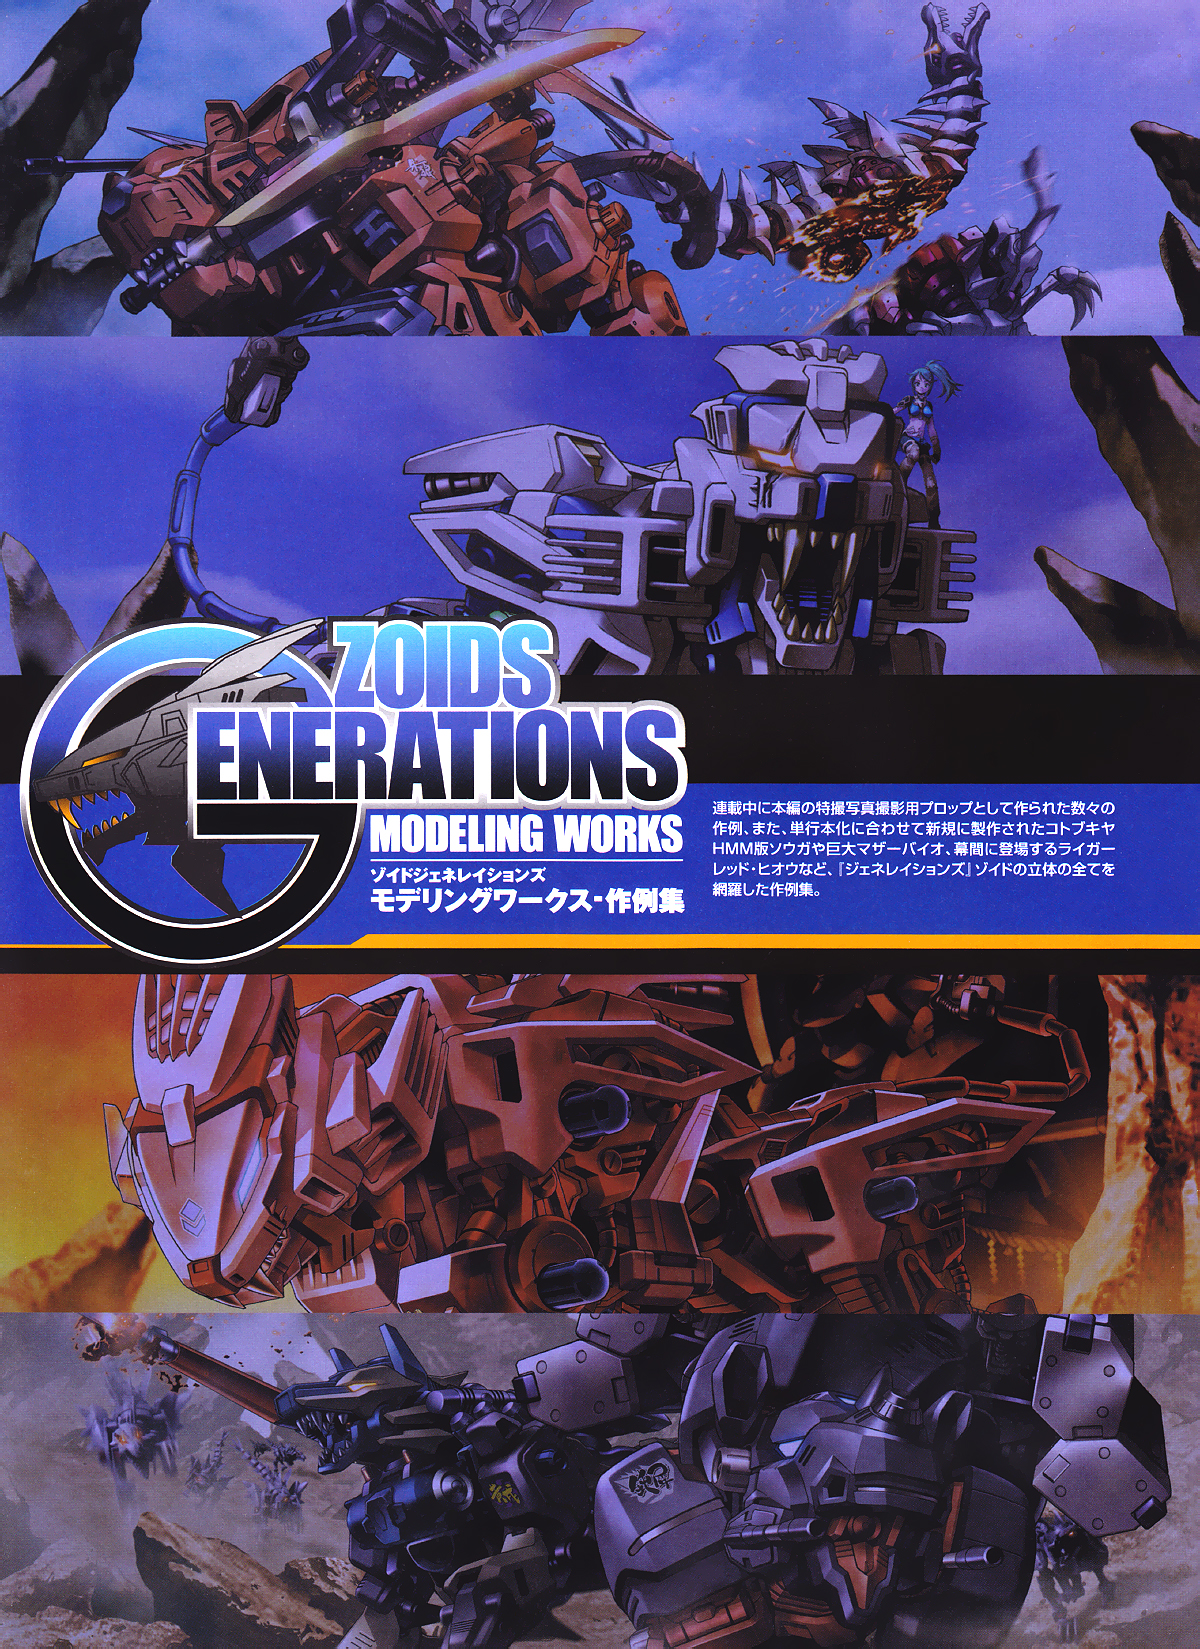
Modeling Works / Example Collection
This example collection covers all of the three-dimensional Zoids from Generations, including numerous examples made as props for special effects photography during the series, like the HMM version of Souga and the giant Mother Bio, newly created for the book, and even Liger Red Hiou, who appears in the interlude.
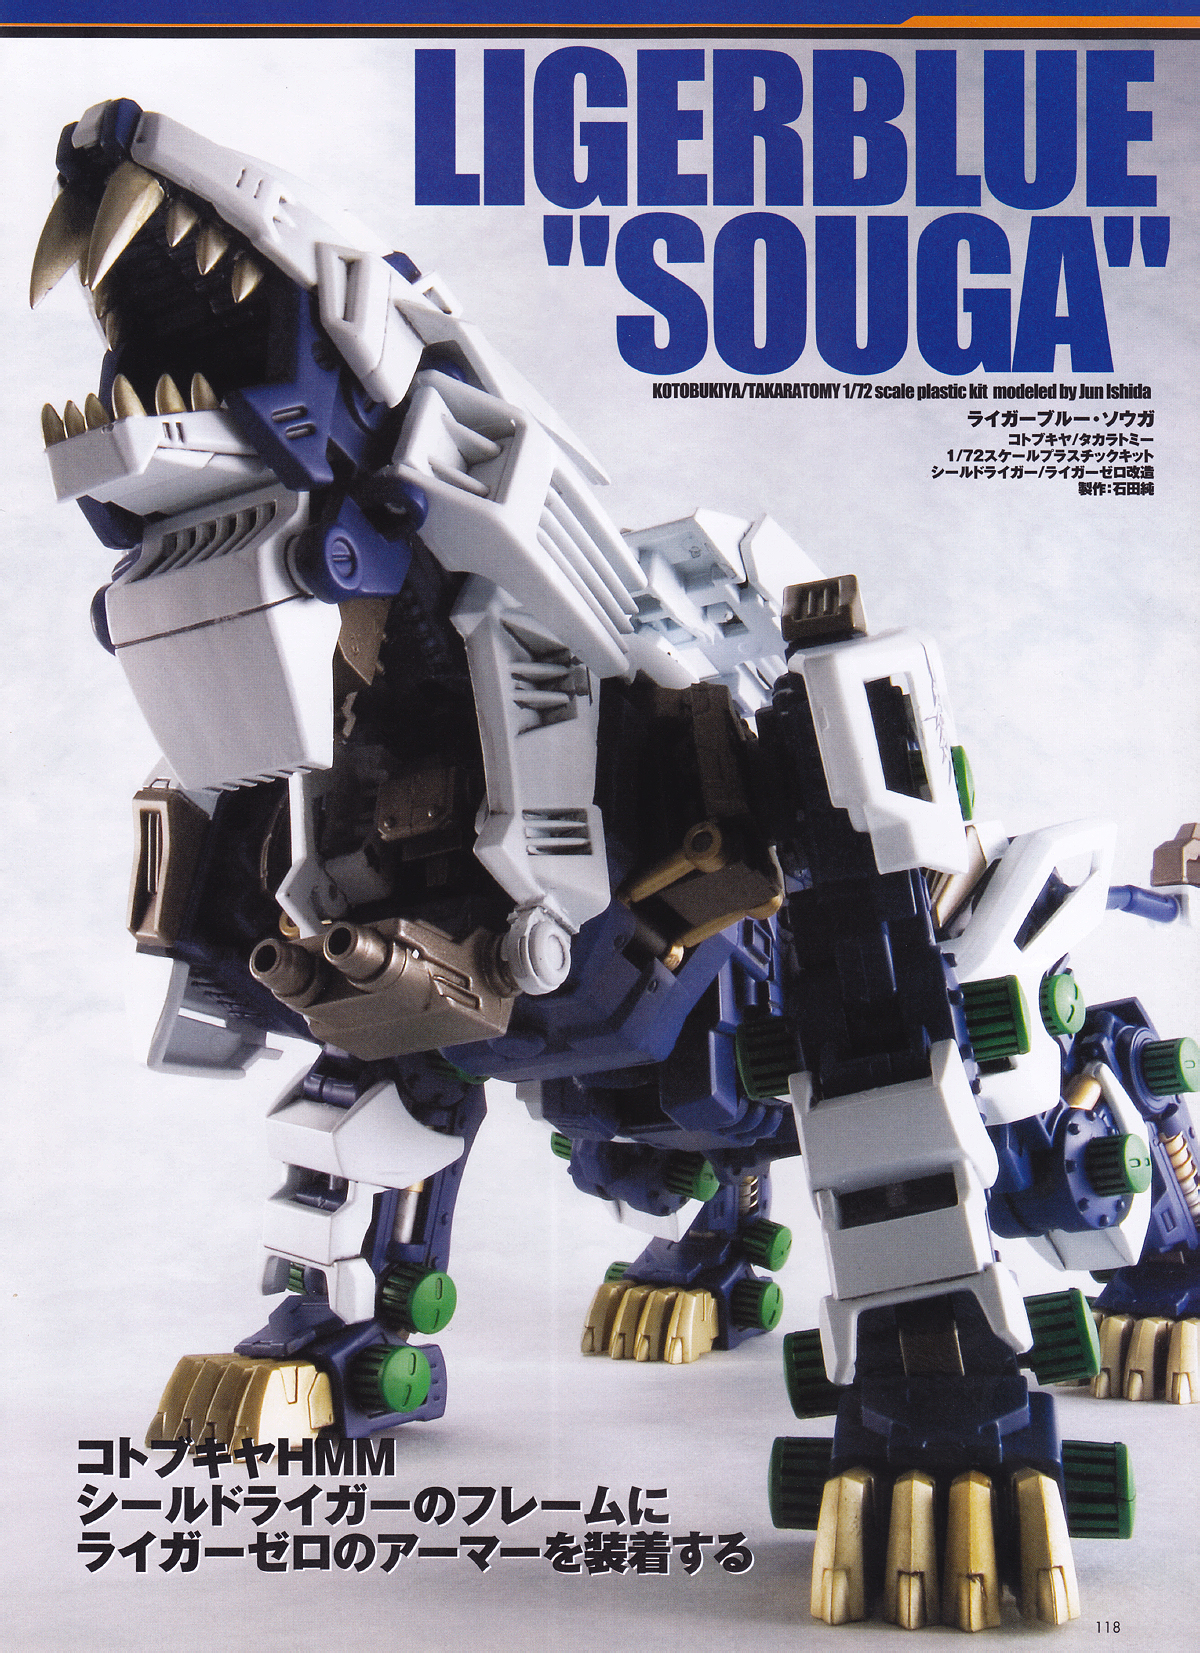
Liger Blue "Souga"
Liger Blue 'Souga'
Kotobukiya / Takara Tomy 1/72 scale plastic kit
Shield Liger / Liger Zero custom
Customizer: Jun Migita
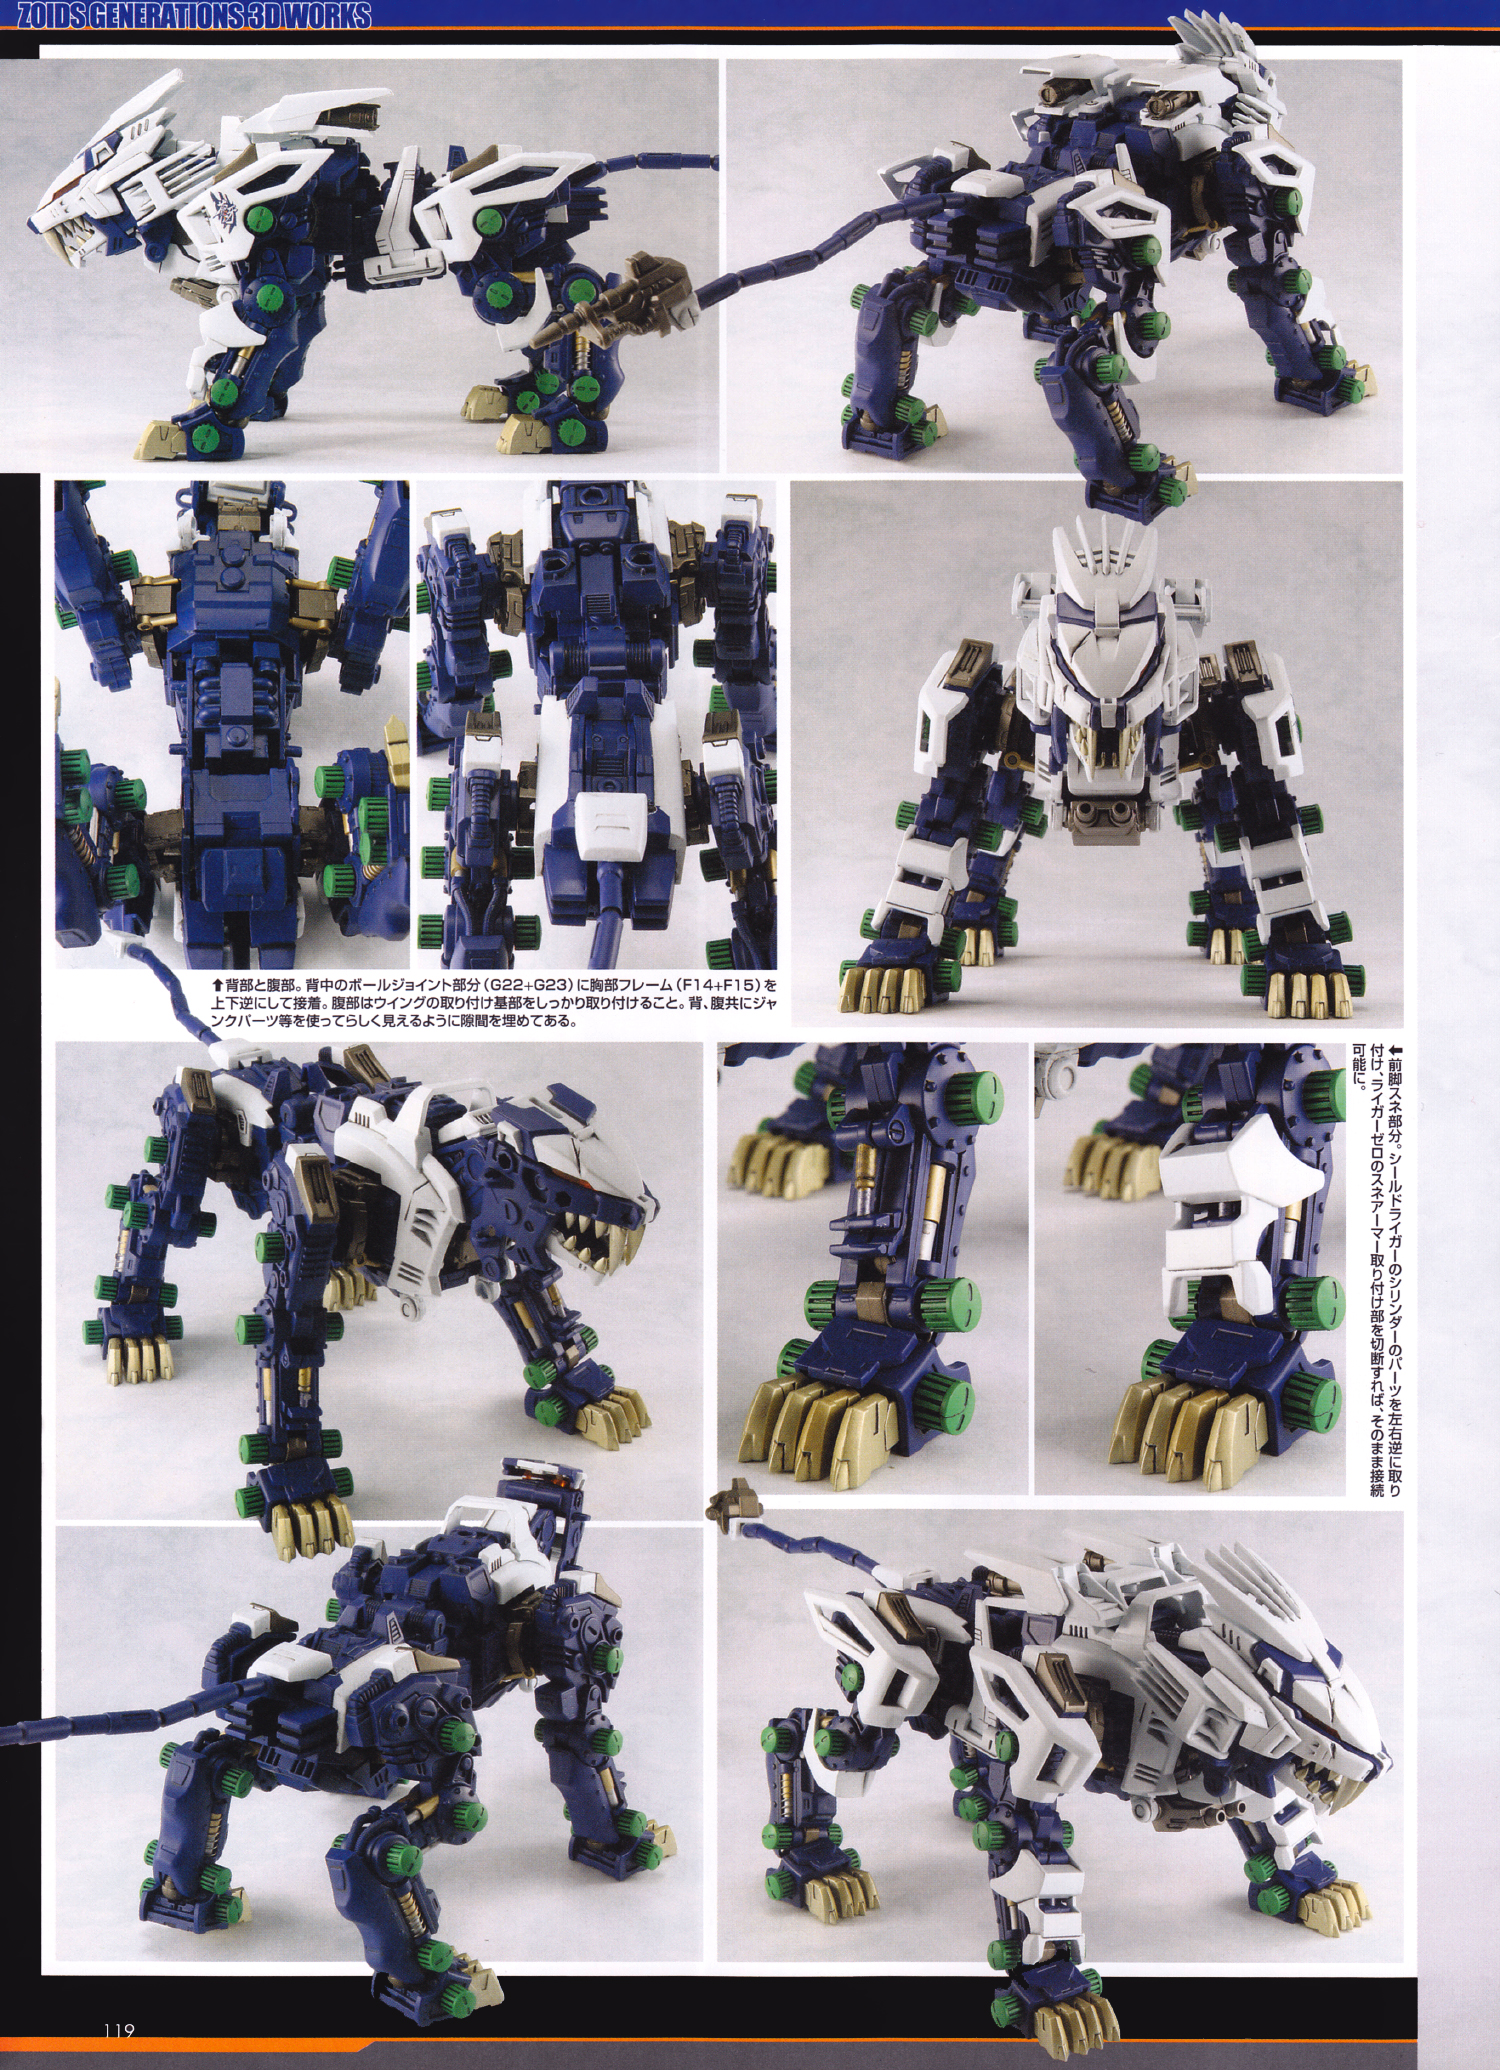
Back and abdomen. The chest frame (F14+F15) was glued upside down to the ball joint part on the back (G22+G23). I was sure to firmly attach the wing part to the body to make it look more realistic by using junk parts and such.
The shin part is a separate leg. I glued the cylinder parts from the Shield Liger on upside down, then cut off the attachment parts from the Liger Zero and attached it as is.
Liger Blue "Souga"
As an example of the commemorative works created for the publication of this book, Kotobukiya's HMM Shield Liger was modified to recreate Souga. There are some parts that had to be forcibly modified to match the actual item, so please refer to the photos as you read along.
■ Head
The top of the Shield's head frame and the upper jaw part were cut, and a 5mm joint was added. The 5mm polycap was inserted to match the hole at the back of the head in the Zero's frame, then connected to the Shield Liger's body. The tongue part of the lower jaw was cut out and the 3mm joint added. The fangs are from the Shield Liger.
■ Neck
The left and right pegs from the Shield's neck were cut off. The neck parts cut from the Zero's torso were attached in a plate-like fashion. It was temporarily attached once and further shaped to match the real thing so that it wouldn't interfere with the movement of the neck. The white part (D26) above the neck was glued in a position that also wouldn't interfere with the head.
■ Chest
The white chest armor part was cut out of the Zero's torso and shaped so that it wouldn't interfere with the movement of the shoulder joints. It was then glued to the Shield parts G8+G9 and G7+G10 and reattached to the frame. The chest frame interferes with the movement of the abdomen, so the rear parts, F7 and F9 were cut out, leaving the PC parts. For the back, the booster attachment was cut off of Zero's A3 part and glued to F23 and F24 respectively. Zero's A4 part was cut from the front of the attachment part and fitted between the armor, then glued. It was then covered by the A5 part with the connection removed and glued on.
The position of every part was adjusted to look like Zero's back, and to allow for the boosters to be attached without any problems. The Shield's F8 part was attached to the bottom, facing the opposite direction.
■ Body
The chest frame was attached upside down to the ball joint on the back. The body parts were then cut out of the Zero's torso pieces and glued to the sides. The back part of Zero's A3 piece was cut out and glued to the back.
■ Waist
I had to narrow the width, so cut the Shield's F25 and F28 parts to the very edge. The frame was then assembled while leaving out the A11 wing, its base, and D31. I cut the waist parts from Zero's torso into a U-shape, and glued G5 and G6 to secure it to the frame. The inside, where it meets the frame and the joint were shaved down by matching them to the actual parts. The F45 cover for the base of the tail was glued to the waist armor. For the tail, a 5mm plastic pipe was glued to the inside of the F42 tip piece.
■ Front Legs
The shoulder piece was cut from Zero's thigh parts, and the back side shaved flat. The peg for the Shield Liger's cap was cut and it was covered by the Zero's shoulder part and glued in place. The gaps were filled with junk parts, etc. Refer to the previous page to see how I kept the lower leg armor from being unable to attach. The ankle section from the Shield was left as is.
■ Rear Legs
As with the front legs, the shoulder section was cut from the Zero's thigh. Then the front joint of the Shield Liger's thigh was cut and transplanted onto the back of the piece. The pegs were cut at the base of the cap and covered with the Zero's shoulder, which was glued into place.
■ Zero Armor
With the modifications to the frame the armor can attach without any additional changes.
- Here's a processing shot of the connections for the limbs. Zero's armor was cut so that it wouldn't interfere with the mobility of the legs, then glued directly to the frame. (Top left)
- The head connection joint. The shield frame was used almost as is, except for the lower armor connection pins (G14 and G30), which were cut off. When attaching Zero's armor, a plastic sheet was inserted as a spacer to adjust the thickness. (Middle)
- Shoulder armor connection joint. The Shield's intercooler connection parts were left out, and the Zero's shoulder armor was glued on directly. It's recommended to carefully adjust your cuts for the thigh parts, matching them to the actual item. (Right)
Gusoku Myoukou
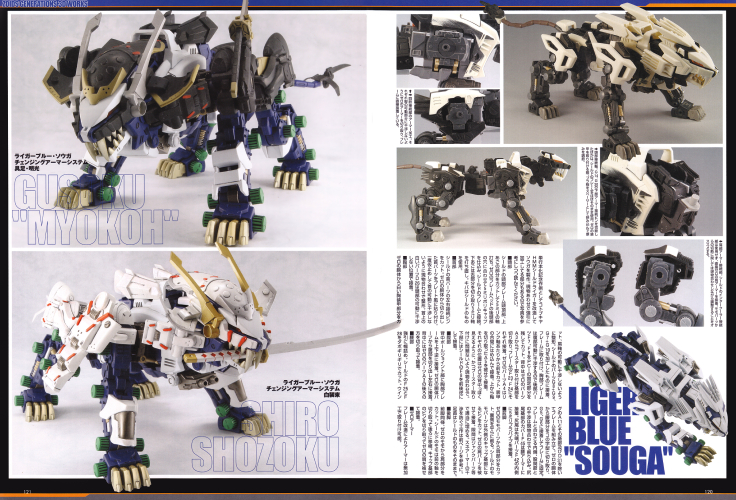
Liger Blue 'Souga'Changing Armor System
Gusoku Myoukou
Shiro Shouzoku
Liger Blue 'Souga'Changing Armor System
Shiro Shouzoku
Gusoku Myoukou
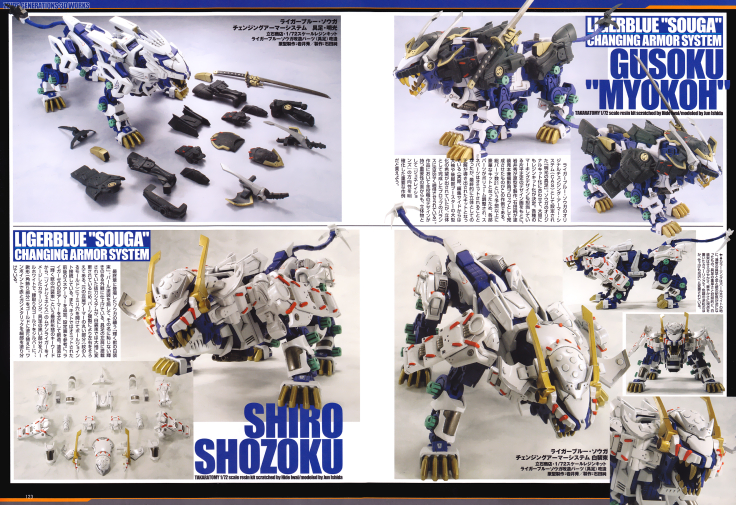
Changing Armor System "Shiro Shouzoku"
Tateishi Store 1/72 Scale Resin Kit
Customized Liger Blue Souga Customize Part (Sold Separately)
Prototype Production: Iwai Hide
Production: Jun Ishida
Gusoku Myoukou, the original Changing Armor System (CAS) made for the Liger Blue 'Souga'. It was boldly decided that it'd be made into a resin kit to coincide with the release of the original Souga kit. Based on the design drawings by Masashi Katahira, who's also in charge of the various marking designs, Hide Iwai created the prototype, and Jun Ishida completed this example as a painted sample and photography prop. Since it turned out to be a more luxurious kit than expected, with a total of 21 parts, the volume of each part was adjusted and the shin pieces were omitted, but in the end, the correct form as a three-dimensional kit was determined. (in fact, the editorial side had requested that the large sleeves and rear leg boosters be made even bigger, but the balance of the completed prop, as a three-dimensional model convinced the editors without any hesitation.) In terms of the importance of the design, as the main character of the work, it was an important example that clarified the direction of Generations as a 3D object.
- The coloring is pearl white with the gold and silver colors reversed from the normal armor. In contrast to the armor's solidity, the white costume is colored with a focus on its brilliance and splendor. On top of reversing the color tones, its also been changed to a gloss finish. (Right page, rights)
Shiro Shouzoku
Liger Blue SougaChanging Armor System Gusoku Myoukou
Tateishi Store 1/72 Scale Resin Kit
Customized Liger Blue Souga Customize Parts (Armor)
Prototype: Hide Iwai / Production: Jun Ishida
The "Shining Beast Shiro Shouzoku" worn by Souga in the final chapter. It's painted with pearlescent paint to give it a shining appearance that lives up to its name. The sword-drawing system installed on the left shoulder of the armor has been changed to a large sleeve in the Shiro Shouzoku, so the left and right sides match by duplicating the parts. A 7mm hole has been drilled in the round part of the original left shoulder armor (the mold with the crest) and a ball joint installed. On top of that, the front and back lower leg armor that was omitted from the kit has been added back in. Based on the design drawings, it's newly built with the Liger Zero's leg armor as its base. The paint is based on the coloring of the Mugen Liger from Zoids Genesis, based on the keywords of the final arm "Shining Beast Shiro Shouzoku (White Robes)". The black parts of the armor have been repainted pearl white, the gold trim with silver, and the kuwagata (the decorative corners) with gold. Red and gunmetal were used for accents in the details.
Liger Blue 'Souga' / Bright Hawk
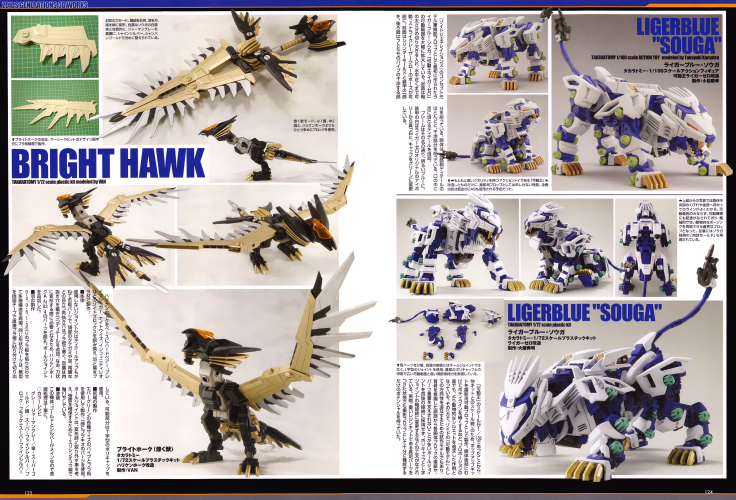
Liger Blue 'Souga'
Takara Tomy 1/100 Scale Action Figure
Modified King of Flexible Liger Zero
Produced By: Takayuki Komatsu
Liger Blue Souga was the first model created as a concept model and photography prop for Zoids Generations. It has a significantly increased range of motion compared to the King of Flexible Liger Zero. The ankles have a notch the width of the peg, allowing them to move almost horizontally and take Strike Laser Claw poses. The cylinder mold and part of the armor have been removed from the front legs, and the parts of the hind legs that interfered with the thigh pipes have also been removed. Most of the abdominal details and interfering parts of the torso have been removed as well. A tongue detail was also added to the mouth.
The frame is bright blue, as the name suggests. The white armor has been changed from the ivory of the original Liger Zero to pure white, and the caps have been painted green.
- As a modified version of the King of Flexible, an action toy with high quality to start with, it's perfect for prop photography. At the beginning of the project, the previously mentioned CAS was also planned to be used. (Top)
- In the photo above, you can clearly see the narrowing in the center of the torso and the line towards the rear. Not only the range of motion but also the movable mechanisms that've been taken into account, making it an excellent prop that can recreate non-mechanical anime-like poses. The soles of the feet also reflect Souga's unique "paw mold". (Right)
Liger Blue 'Souga'
Liger Blue 'Souga'Takara Tomy 1/72 Scale Plastic Figure
Produced By: Hideaki Taisen
Since the scale of the King of Flexible was 1/100, a pop-up kit was created as an articulated photography pop to help unify its scale with the other kits. The proportions of the body were also adjusted to create a more animal-like silhouette, with the body tapering off towards the rear. On the other hand, it was also a prototype model to pursue the direction of Zoids as 'movable models' and was designed with various ingenious features, such as taking the connection of each torso block, from the head to the tail into account and, instead of using ball joints to connect the limbs, which often can't support the weight of the parts, instead using peg connections using polycaps and L-shaped joints. In fact, even with the armor parts, which are from a heavy resin kit attached, it has the potential to function perfectly well as a photography prop.
- Each part, disassembled. The limbs are connected using L-shaped joints instead of ball joints, and when used in combination with the polycaps at the base, it achieves a high range of motion and high joint retention. (Bottom)
Bright Hawk
Based on Hurrcane Hawk, parts from other Zoids BLOX like the Hard Bear, Brave Jaguar, Nightwise, and Finity Leo were arrange, and the wings and tail were made from plastic sheets.■ Main Body
Unused joint holes were made from commercially available parts to add detail, and noticeable holes in the mane, feet, tail, and head were filled with plastic sheets. The holes in the soles of the feet were filled while adding detail. In addition, holes were drilled into parts of the Hurrcane Hawk, A-N03-4, and ball joints were added in, as they're necessary when transforming it into a sword shape.
■ Making the Wings
0.3, 0.5, and 1.0 plastic sheets were glued together to recreate the multi-layered structure. Parts of the same shape were cut out by attaching paper templates directly to the plastic sheets with double sided tape. T-shaped polycaps were used for moving parts.
■ Making the Tail
Made using Evergreen pipesand plastic sheets of various sizes, with some parts from the Brachio also used. The ball joints are set on a peg and use 1mm brass wire for structural integrity, as they're removed when transforming.
■ Painting
This unit is mainly gold and silver, so the surface was carefully treated.
■ Color Recipe
Gray: German Gray / Gold: Super Gold / Silver: Super Fine Silver / BLOX: Black + Super Fine Silver
- Sealing Sword Mode. The head transforms into a ferrule, the wings into a blade, and the tail into a handle. In contrast to Souga's Shiro Shouzoku, the color scheme is German Gray with a subdued Shine Silver and Champagne Gold. (Top)
- The Sparkling Beast Mode. It uses one small and two medium BLOX, one more than Hurricane Hawk. (Right)
- Bright Hawk's wings are made from laminated plastic sheets based on the design drawings by Mercy Rabbit. (Left)
Bright Hawk (Sparkling Beast)
Takara Tomy 1/72 Scale Plastic Kit
Customized Hurricane Hawk
Produced By: VAN
Liger Red "Hiou"
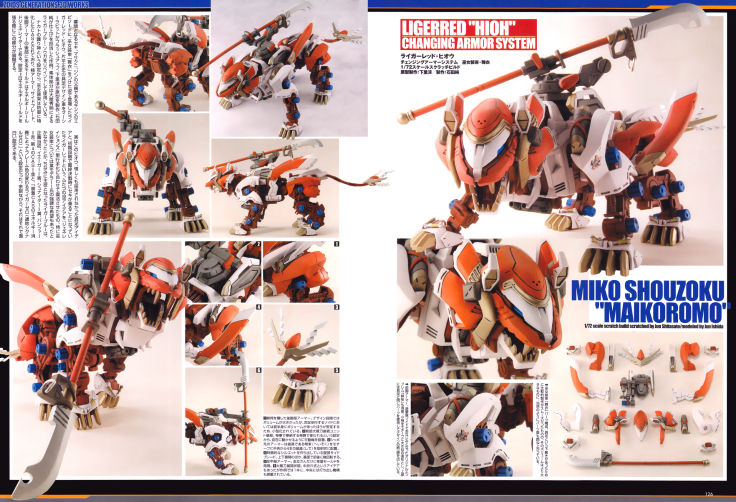
Liger Red Hiou
Changing Armor System / Miko Shouzoku / Maikoromo
1/72 Scale Scratch Built
Prototype: Jun Shimosato Production: Jun Ishida
Liger Red "Hiou" appeared in the interlude episode about Seki, Masakuni, and Gishin, Jin's father, wearing the Miko Shouzoku "Maikoromo". The armor design by Masashi Katahira was brushed up by Mercy Rabbit, sculpted by Jun Shimosato, and finished by Jun Ishida. The body part was repainted and reused from the Liger Blue Souga by Iwai Hide.
As Nakato's guardian deity, the Miko Shouzoku is a CAS specialized for defense, and the molds on the cheek armor, side blades, and back of the hind leg armor are shield generators. In the setting, these parts deploy when the energy shield is put up.
In fact, this Hiou is a revival of two rejected ideas for the Generations book: The idea for Gusoku that regrettably didn't get adopted, and a Liger Red that Seki was supposed to ride into the early stages of the final battle. The Miko Shouzoku, in particular, was the subject of a strong request from a certain modeler, Ichi. Incidentally, Liger Blue, which played the leading role in the project, was originally planned to be "Liger Zero" (referred to as Signal Zero), whose frame color changed depending on the energy consumption of its CAS, with Jager = Blue, Schneider = Yellow, Panzer = Red, and the fourth CAS = Gold. As an aside, it's an interesting setting idea in and of itself.
❶ The rear leg armor imitates a scarlet hakama. It was larger in the design stage, but for a quadrupedal Zoid, having more volume at the front would make it more stable, so it was made smaller.
❷ The base of the large naginata connection unit on the back. Since it's set to be used in the divine dance dedicated in Shinto rituals, a movable joint was installed to allow it to move freely.
❸ The armor at the tip of the tail is based on a heisoku motif (a sacred offering), a purification tool with four paper streamers arranged around it from the center.
❹ The side blades on the body, which create a distinctive silhouette. In addition to being deployed up and down, they can also rotate back and forth using the joint at the base.
❺ The armor on the paws. The sandals are molded to fit the shrine maiden look.
❻ The large naginata when deployed. There was an idea to make it fold in the center, but in this example it's all one piece. It also has a firing mechanism in the center.
- Miko Shouzoku "Maikoromo" part composition. Although the production was relatively smooth because of the base armor, the overall volume was much larger. Naturally, the number of parts have also increased. (Right page, right)
- Front Leg Armor: The original Hiou emblem, which has become a familiar aspect of the Commando Zoids is also included. The large shape is based on a kosode motif, and the upper part uses the same parts as the armor to create a sense of unity in the design. (Right page, left)
Rez Wolf
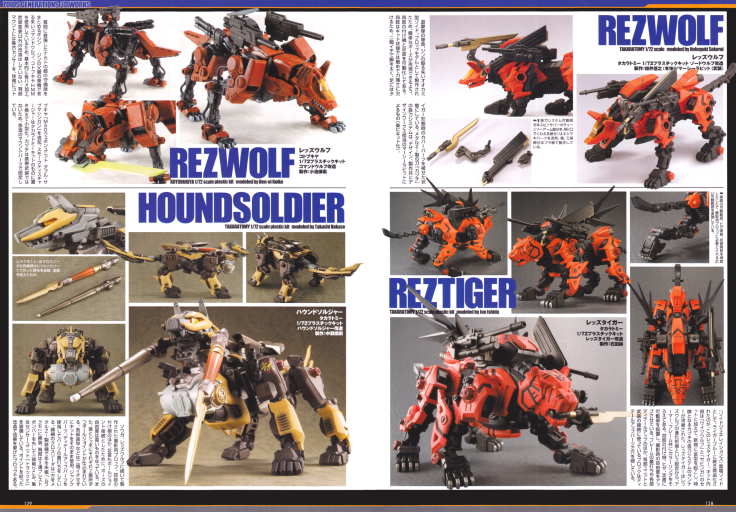
Rez Wolf
Modified Takara Tomy Sword Wolf 1/72 Plastic Kit
Produced By: Nobuyuki Sakurai (Main Body) / Mercy Rabbit (Weapon)
The vermilion wolf Zoid driven by Jin, the captain of the Commando Squad. Since it was made as a prop model, the base of the limbs and the ankles are movable to enable simple poses. Since the limbs are thin and not very strong as a kit, they were made thicker by combining two pieces, and the feet were covered with the paws from the tiger form. The sword drawing system of the Metal Zi Sword 'Kadzuchi' was designed and produced by Mercy Rabbit, who's in charge of the design works (and it was later made into a kit.)
- The movable parts for the sword drawing system is the chainsaw arm piece from the Spinosapper and the handle (the part that's held in the mouth) is a screw-wrapped part. The sheath and blade are made of plastic sheeting. (Right page, top center)
Rez Tiger
Rez TigerTakura Tomy 1/72 Plastic Kit
Modified Rez Tiger
Produced by Jun Ishida
The Rez Tiger is a Zoid that appeared in Zoids Generations, and was commercialized after Liger Blue. The kit is a set including Whitz Wolf and Savinga, as well as a newly molded runner for the characteristic Kadzuchi sword-drawing system. The Rez Tiger is set as an evolved form of the Rez Wolf, so both the armor and frames are colored the same. Movable parts were installed at the base of the limbs, knees, and ankles, increasing its freedom when photographing. On top of lining the frame and adding details to each part, the holes in the BLOX used to connect the back unit and the weapons were hidden with detail-up parts.
- The range of motion of the rear legs. The addition of knee and ankle joints allows for a wider range of motion, which is needed for a photography prop. (Right page, right)
Rez Wolf (HMM)
Rez WolfKotobukiya 1/72 Plastic Kit
Modified Command Wolf
Produced by Koike Den'ei
The scarlet command wolf piloted by Gishin - Jin's father, who leads the garrison of Nakato City, which appeared in the interlude. Since it uses a Kotobukiya HMM, it hasn't been modified except for fitting and armament changes. A collective sensor has been added to the back mount, and Kotobukiya's MSG Weapon Unit Double Submachine Gun was added to the side of the body. The smoke dischargers have been replaced with the ones from the Takara Tomy kit and made smaller. Kadzuchi, in this case, isn't a portable weapon, so it's fixed in place with a makeshift mount.
Hound Soldier
Hound SoldierTakara Tomy 1/72 Plastic Kit
Modified Hound Soldier
Produced by Takashi Nakase
A prop made for photography, following Souga and Rez Wolf. The ankles as well as the base of the limbs have been attached with ball joints, allowing for a high degree of freedom when posing. There's also two ball joints in the neck and tail. The armor for each part isn't made of two separate pieces but uses the kit as it is, with junk and detail-up parts used to back it up. One of the Cross Swords on the side of the head was replaced with Metal Zi equipment, the red spear Murakumo, and the 3-Shot Breast Bomber's been removed from the chest and the part shaved down, with a collective sensor unit "Towotsutsumi" installed. This is a prop that's been effectively modified with specific focuses in mind.
- Murakumo (above) is a Cross Sword with a tip made from junk parts attached to the tip and then repainted. (Left page, center left)
Hebby Rhimos
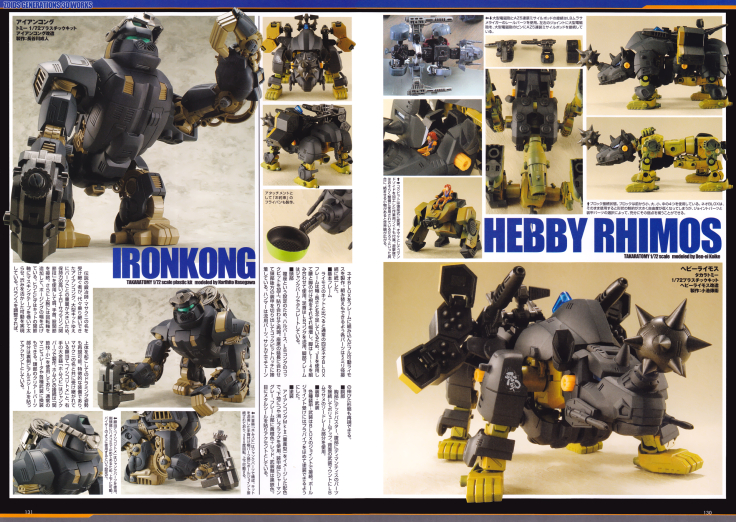
Heavy Rhimos
Takara Tomy 1/72 Plastic Kit
Modified Heavy Rhimos
Produced by Koike Den'ei
A fully movable Rhimos was created with Neo BLOX built into the frame. Each part used a standardized 5mm connection so that it could be rearranged.
Basic Frame
Compared to the Rhimos kit, the normal four-legged Neo BLOX frame wasn't quite sufficient in either length or width, so the J8 piece was used to increase the width at the base of the waist and legs respectively. The legs are a combination of L1 to 4. The ankles are reused from LB Kong, and the leg frame is decorated with junk parts.
Head
Since it's set to be a two-seater the cockpit of the Harpers and LB Kong were customized and fused together to create the effect. The armor behind the head was cut to match the extension of the seat and glued to the cockpit. The hammer is a reused part. The form with the chain extended can also be recreated with replacement parts.
Torso
The overall volume has been increased by connecting a Deadbuster to the chest and Demantis parts to the abdomen. The sword rail part from the LB Murasame is used for the armament mount on the back.
Armor and Weapons
The various armor and weapons are connected with BLOX joints. A plastic pipe was attached to the ball joint socket so that it can be painted.
Painting
The color scheme was inspired by the Iron Kong MK-II (mass production type), with a matte black base, German Gray for the armor, yelow orange + red for the frame, and Black Iron for the armaments. Metal stickers were attached to the eyes as accents.
- The Large-Bore Electromagnetic Cannon and the AZ 5-Shot Missile Pods are connected using rail parts from the LB Murasame Liger. The two Large-Bore Electromagnetic Cannons are connected to the left and right joints, and the AZ 5-Shot Missile Pod is connected to the peg of the Large-Bore Electromagnetic Cannon. (Right page, top)
- BLOX connection joitn. Four BLOX (small, large, small, medium) are used for the front. Although the Neo BLOX has large restrictions when it comes to shape and less flexibility if you use them as is, the choice for joint and armor parts sufficiently compensate for that weakness. (Right page, right)
- The cockpit has been changed to a two-seater type. As a bonus, there's an included work Zoid made from a modified Command Zoid. Having small items like this connected to them helps expand the world view, especially when including things that'd probably be used for maintenance in the guerrilla unit. (Right page, left)
- The "promised" frying pan has also been created as an attachment. (Left page, rights)
Iron Kong
An Iron Kong, which has been ridden by those who inherited the name of the legendary blacksmith Masakuni for generations. Since it's a large kit and each part is heavy, the shoulders wrists, and hips are connected using Yellow Submarine's "Joint Technique" which has excellent retention strength. On top of that, movable joints were added to the upper arm to expand its range of poses. The elbows and knees are are thickened by wrapping masking tape around the joints of the kit, allowing them to move with austerity. After adjusting its balance it can also take on a drumming posture with the front half of the body raised. His characteristic equipment, the forehead plate "Ishikoritome", which has been handed down with the Masakuni name, and the large hammer "Homusubi" held in his right hand are made from junk parts. Homusubi is connected using the Joint Lock, Small and can be replaced with a normal manipulator or various other weapons. The clear parts on the head have aluminum stickers on the back for accent.- The large hammer "Homusubi" is made of junk parts. It's connected to the wrist's base piece with a ball joint, the wrist being reused from the kit. It can rotate 360 degrees and move up and down. (Right page, bottom center)
- The forehead protector "Ishikoritome" is made of junk parts and attached to the side of the head with a snap, so it can move up and down. It's set up to be used like a visor. (Right page, bottom left)
Gunz Raser
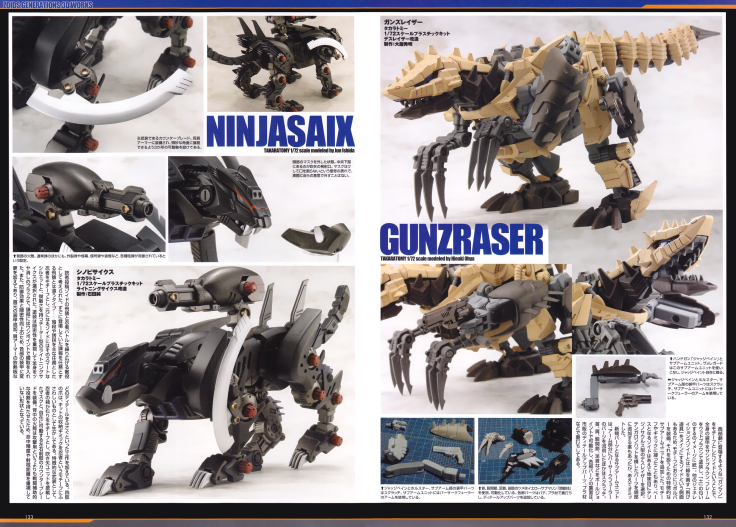
Gunz Raser
Takara Tomy 1/72 Scale Plastic Kit
Modified Death Raser
Produced by Iwai Hide
Since this Zoid is based on the motif of a 'gunman' from a western movie, the armor of the entire body is painted Sand Brown and the body is painted Wood Brown, unifying the image of 'earth.' Since it's a Zoid that mainly uses 'projectiles', which sets it apart from other Generations Zoids, it's equipped with a revolver to fit its motif, and has an added sub-arm unit for handling it. Since I was particular about the motif and gimmick, I deliberately chose a plain Therizinosaurus-type Death Raser Zoid. There was a plan to add a part on the head that resembled a ten-gallon hat, but we decided against it.
- The sub-arm unit, which is a new part, was made from scratch, except for the Berserk Furher parts used for the arm. The neck, shoulders, hip joints, ankles, etc. were all made movable with ball joints, and the back of each part is lined with commercially available detail-up parts and plastic materials. (Right page, middle right, top)
- The handgun, Judgebane, and the sub-arm unit. Veauregard uses this sub-arm unit to control Judgebane at will. (Right page, middle right, bottom)
- Judgebane, its holster, and the armored parts of the sub-arm are scratch built. The sub-arm unit uses the arm of the Berserk Fuhrer. (Right page, bottom left)
- The neck, hip joints, ankles, and claws on the front legs were articulated using Yellow Submarine's "Joint Technique". Each part is backed with putty and plastic material with detail-up parts added. (Right page, bottom right)
Ninja Saix
Shinobi SaixTakara Tomy 1/72 Scale Plastic Kit
Customized Lightning Saix
Produced by Jun Ishida
It was conceived as an enemy that'd engange in a ninja battle with the reader-submitted Zoid, Tobizaru. It's a different type from the Tobizaru who's already shown up here, whose mission was intelligence gathering - it's based on a ninja who's main mission is assassination and kidnapping, and the original Zoid chosen to take this role was the cheetah-type Lightning Saix with its sleep silhouette and agiiity. The whole body is painted a matte black with an emphasis on stealth, and the head was given a simple marking. In addition, changes have been made to the armor in various spots to improve its defensive effect and stealth. For example, adding armor to the neck and sealing details such as the heat sinks in the shoulder armor. The claws make use of the kit's retractable gimmicks, which are appropriate for the ninja motif. Distinctive weapons include a mask with a blowgun unit based on the motif of a ninja's balaclava, and the counter blades on the shoulders, which can be freely moved. The canisters on the back is designed to be a combat aid rather than an offensive weapon, so its shape doesn't emphasize accuracy or range.
- Here's the head with the mask removed. The nozzle for the blowgun is located at the bottom center. The mask is a symbol of his intentions to never reveal a thing, and he never removes it of his own volition.
- Its main weapon is the Counter Blade. There's one equipped to the armor of both shoulders, and they have three points of articulation so that they can be deployed at subtle angles.
- The gun on the back. In addition to regular ammunition if can fire a variety of types, such as explosive shells, smoke screens, signal flares, and smoke signals.
Blitz Pepsis
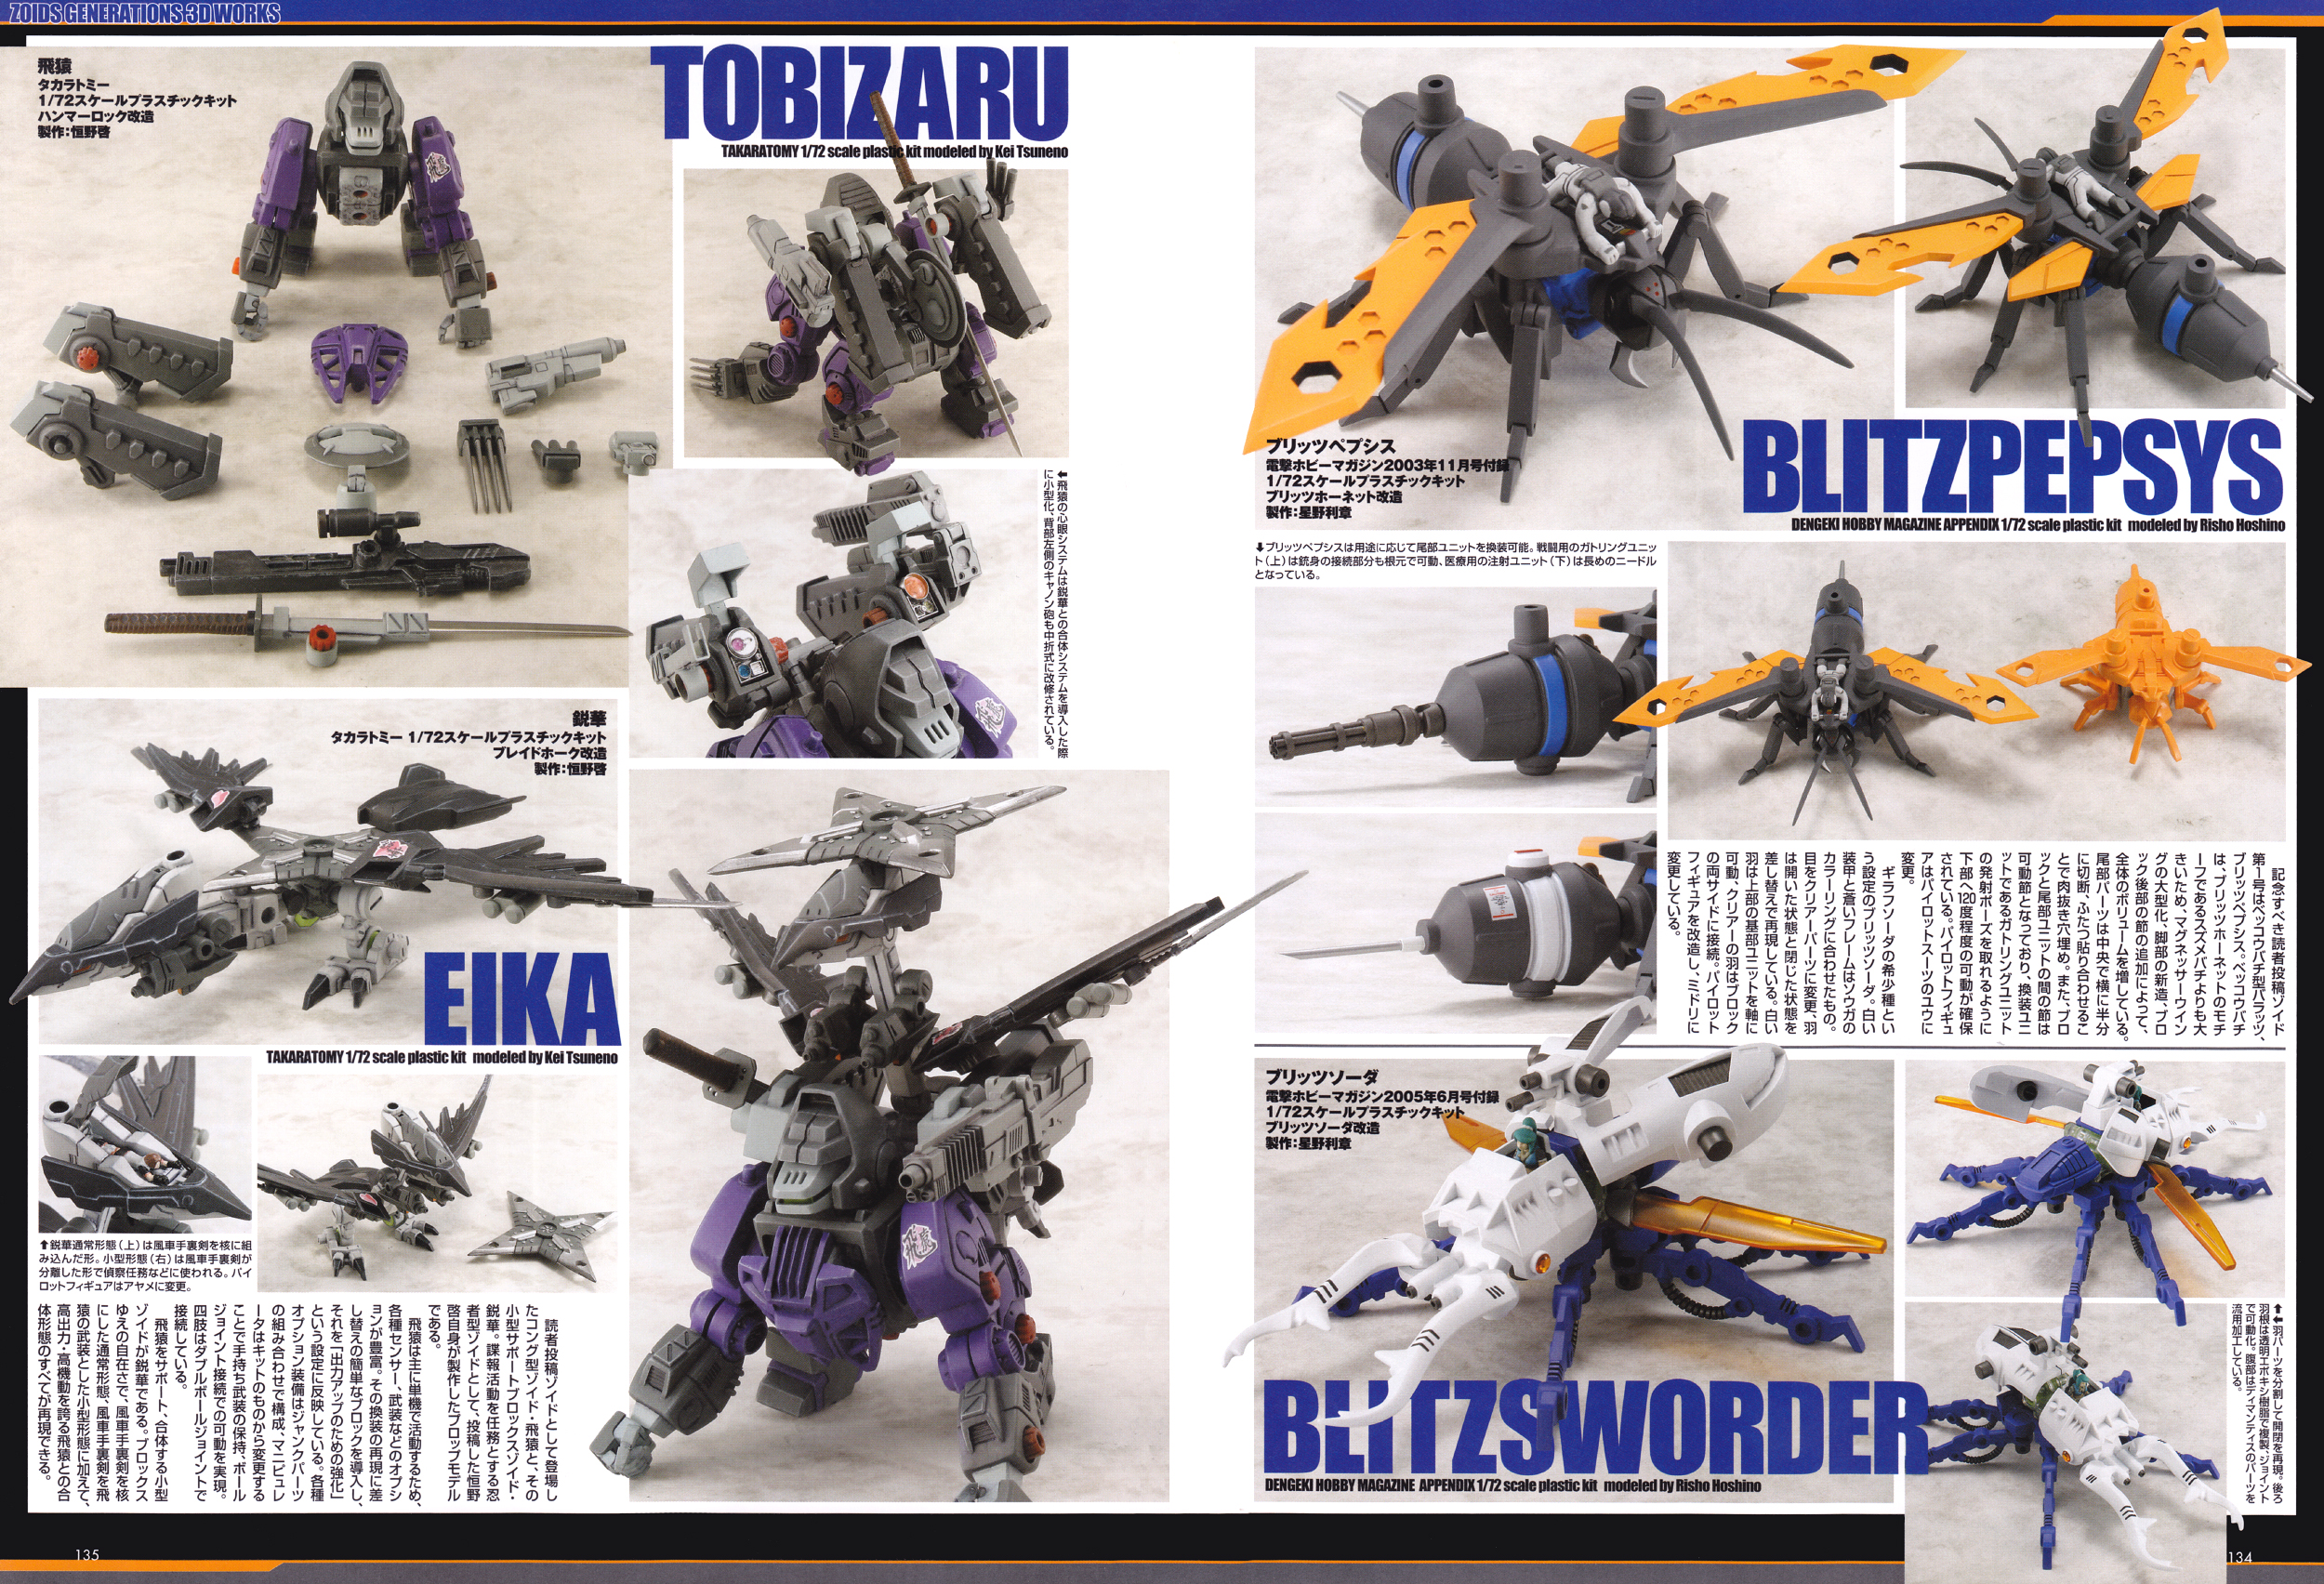
Blitz Pepsis
Dengeki Hobby Magazine November 2003 Issue Bonus
1/72 Scale Plastic Model Kit
Modified Blitz Hornet
The first reader-submitted Zoid is the Tortoiseshell Wasp type Baratz, the Blitz Pepsis. The Tortoiseshell Wasp is larger than the hornets used as the Blitz Hornet's motif, so the overall size has been increased by enlarging the Magnesser Wings, creating new legs, and adding joints to the back of the BLOX. The tail part is cut in half horizontally along the center, and the two pieces are glued together to fill the holes. In addition, there's a movable joint between the BLOX and tail unit, and it can move about 120 degrees downwards so that the Gatling Unit, a replacement unit can be posed for firing. The pilot figure's been changed to Yuu in a pilot suit.
Blitz Sworder is set as a rare species of Girafsworder. The white armor and blue frame match Souga's colors. The eyes have been changed to clear parts, and the wings recreate their open and closed state by swapping them out. The white wings are movable around the joint of the upper base unit, and the clear wings are connected to both sides of the body. The pilot figure has been modified and changed to Midori.
- The tail unit of the Blitz Pepsis can be replaced depending on the needed purpose. The Gatling Unit for combat (top) has a movable base where the gun barrels connect, and the Medical Injection Unit (bottom) has a longer needle. (Right page, top left)
Blitz Sworder
Blitz SworderDengeki Hobby Magazine June 2005 Issue Bonus
1/72 Scale Plastic Kit
Blitz Sworder Modification
Produced By: Toshiaki Hoshino
- The wing parts are divided to create opening and closing. The back wings are recreated with epoxy resin and made movable with joints. The abdomen was made using parts from Demantis.
Tobizaru
Takara Tomy 1/72 Scale Plastic Kit
Hammer Rock
Produced By: Tsuneno Kei
The kong-type Zoid, Tobizaru, which appeared as a reader-submitted Zoid and its small support BLOX Zoid, Eika. They're prop models created by the submitter Tsuneno Kei as ninja-type Zoids on an intelligence mission.
Tobizaru mainly operates alone, so it has a wide range of options such as various sensors and weapons. To recreate this conversion, simple replacement BLOX have been introduced, reflecting the setting of "strengthening for increased output." Various optional equipment is made up of a combination of junk parts, and the manipulator has been changed from the one in the kit to allow it to hold hand-held weapons and move with a ball joint connection. The limbs are connected with double ball joints.
The small Zoid that supports and combines with Tobizari is a brilliant sight. Thanks to the flexibility of BLOX, it can be recreated in its normal form with the Windmill Shuriken at its core, its small form with the Windmill Shuriken as Tobizaru's weapon, and even as its combined form with Tobizaru, which boasts high power and mobility.
- Tobizaru's Shingan system is miniaturized when the combination system with Eika is introduced, and the cannon on the left side of the back was also modified into a folding type. (Left page, top)
Eika
EikaTakara Tomy 1/72 Scale Plastic Kit
Modified Blade Hawk
Produced By: Tsuneno Kei
- Eika's normal form (top) has a Windmill Shuriken built into the core. The small form (right) has the Windmill Shuriken separated and used for reconnaissance missions. The pilot figure has been changed to Ayame. (Left page, bottom left)
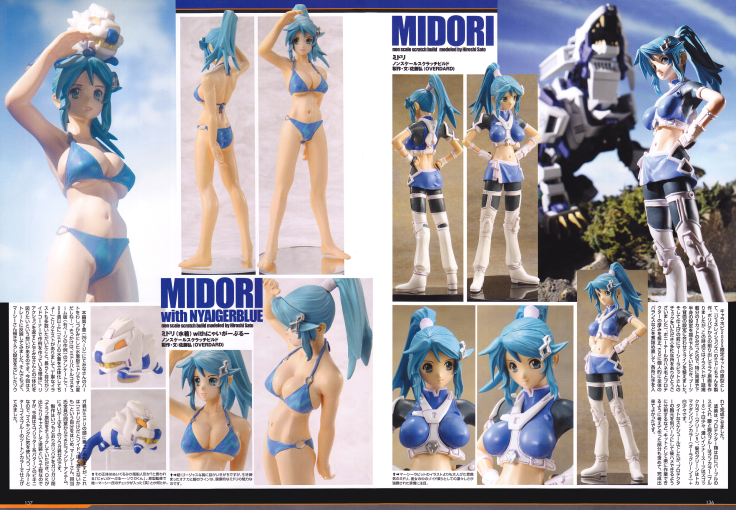
Midori
Non-Scale Scratch Built Figure
Produced and Written By: Hiroshi Satou (OVERDARD)
I created Midori from Generations as a prototype for the Chara Hobby 2005 limited kit. I made a rough image by carving out poly putty, but at this point there were only three cuts from the first episode, so I asked for a drawing of her back and lower body, and adjusted the lines to match the boots and back. Then, before finishing it off, I had Mercy Rabbit check it (thank you for taking the time, despite your busy schedule) and corrected the hair on the ponytail and the thickness of the protectors, then personally refined the overall balance and finished by touching up various areas.
The protectors are painted white with purple shading, the blue on the waist and chest is Gouf Color (Blue 8) + a little white, the dark inner suit is Z-Gok Color (Green 5), and the green on the hair is Tokamak Dunbine Color (Aura Green 2) + a little white.
It was a tight schedule, but I'm glad we were able to complete it, including some parts that were thought out to make the kit easier to work with, such as splitting the chest area of the protector into a separate part so that it could be attached later.
- Midori has a more mature atmosphere than in Mercy Rabbit's illustrations. Note her facial expression, which emphasizes her dignified nature as a Zoid pilot. (Right page)
Midori (Swimsuit Edition)
Midori (Swimsuit Edition) with Nyaiger BlueNon-scale Scratch Built Figure
Produced and written by: Hiroshi Satou (Overdard)
This is the swimsuit version of Midori, which captured everyone's hearts in the main story's second chapter (page 26) (It was summer after all!) It all started with a survey for the Midori Battle Costume version (example on the right page), where over 100 people sent their requests to "Make Midori's swimsuit three-dimensional!" along with us receiving many detailed illustrations. One of the reasons I've been making examples in the Zoids Corner for such a long time is that I want to integrate with everyone by responding to their reactions. This time, I tried to reflect that more directly. And Souga, based on an original drawing by Mercy, is sitting on Midori's head, but this is a fancy item that was created after an agreement between myself, Mercy, and all the other people in charge, who all agreed that "Midori alone might not look like she's from Zoids", thus this Nyaiger Blue Souga was added.
As usual, the production process involved scraping off the poly putty and having the rough prototype checked, and once that's okay, it's then recast and painted, but this time with a bikini with a splitter pattern, so I was careful when it came to masking and finished it in a two-tone blue and turqoise blue color.
- Superb! While your eyes might be drawn to her gorgeous breasts, the lines of her toned belly and legs are what make Midori look so healthy and attractive. (Left page, right)
- A stuffed animal or a balloon doll? It's actually called Nyaiger Blue Souga-kun. The only one who supervised the prototype production was Mercy (laughs.) (Left page, left)
Mother Bio
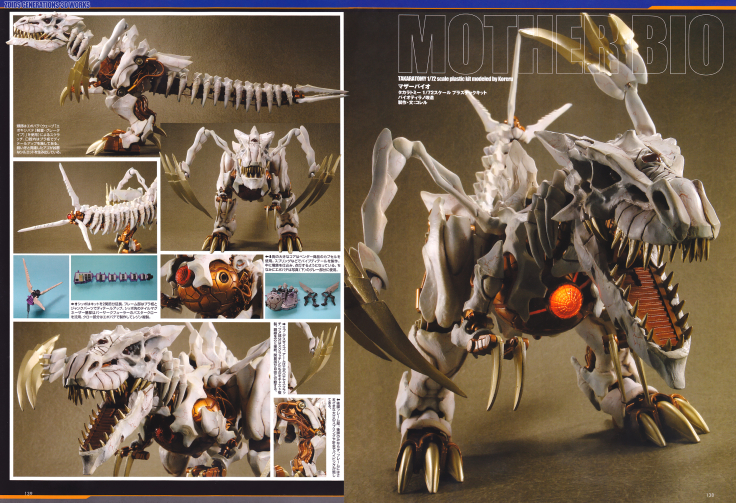
Mother Bio
Takara Tomy 1/72 Scale Plastic Kit
Customized Bio Tyranno
Producer / Writer: Corel
- The head is scratch built with epoxy putty (Wave's "Lightweight Gray Opoxy Putty"), and the cavities are detailed with plastic sheeting. The sharp fangs and developed jaws create a ferocious silhouette. (Top left)
- The large core in the chest is a capsule from a vendor product. The pipe details are made with springs and other materials. Electric lights are installed inside so that it lights up. Incidentally, epoxy putty is also used for the gray parts in the photo (below.) (Middle right)
- The tail is extended by two segments from the kit, and the frame is detailed with with plastic sheets and junk parts. The base of the Tail Magnezer at the end of the tail is reused from the Berserk Fuhrer's Buster Claws, and the claw parts are made with epoxy putty and replicated with resin. (Middle left)
- Rib Death Scythe. The arms are made with epoxy putty and the claw parts are cast replicas of scratch built ones. Copper wires are connected to the core, and the joints can move freely. (Bottom right, top)
- The rear leg frame part. Not only the rear legs, but the frame itself is also piped with springs and wires of various thickness. (Bottom right, bottom)
Mother Bio
■ Head
It was decided that it'd be difficult to recreate the design drawing with mere kit modifications, so it was fully scratch built with epoxy putty. I used a lightweight type, but even still it ended up being too heavy, and I had to cry about it later.
■ Bio Zoid Core
I was asked to make the core glow, but because I had no experience with electric lighting, this was the biggest challenge. I glued two large gashapon cases together, coated them with epoxy putty and put an LED inside. I reused the battery box from the kit, but it would flash if left as is due to the circuit broad, so I extended the lead wire from the battery's metal fittings and connected them directly to the LED.
■ Rib Death Scythe
I made a prototype using epoxy putty and duplicated it. Copper wire was used for the connections, and each joint is movable.
■ Tail Magnezer
Because the head was so heavy and the modifications were concentrated towards the front of the body its balance left it prone to tipping over. I quickly extended the tail by two joints to balance it out, and somehow managed to make it stand on its own. To prevent the ball joints from becoming worn out due to the weight I reinforced it with copper wire. I also made a prototype of the Tail Magnezer, duplicated it, and made them movable using sprues.
■ Painting
The frame wa spainted copper and shaded with enamel red. The claws are Super Gold. The Bio Armor is painted with V-Color White as a base, then randomly sprayed with blue and yellow lacquer paint and painted with matte white. I wanted to make it look like textured CG. The veins are drawn bit by bit with a face brush.
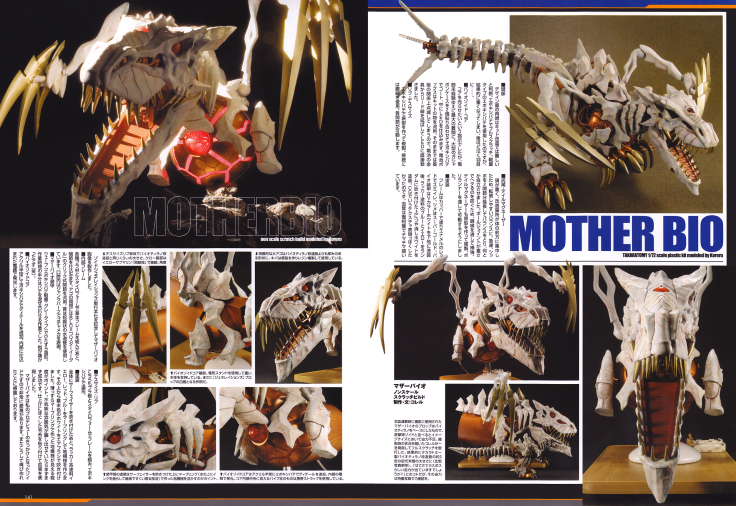
Mother Bio (Bust)
Mother BioNon-Scale Scratch Built
Producer and Text: Corel
The Mother Bio prop used for the photoshoot when the magazine was serialized was based on the Bio Tyranno, and it wasn't impressive enough in terms of image size when lined up with the Commando Zoids. After hearing about the situation at the time of shooting, Corel decided to carey out a full scratch build. As a result, it turned out to be an unprecedented size, about three times the size of the modified Takara Tomy Bio Tyranno (see comparison photo.) "So, does it have the power of a final boss?" was the question, but you can check out the special effects photos to see just how powerful its presence is.
To commemorate the publication of the Zoids Generations book, I created a Mother Bio bust.
■ Internal Frame
After assembling the basic frame from various plastic materials and styrofoam, I added various parts. The click joints from the BLOX Buster Eagle were used to open and close the jaw. The neck is made of a bellows-shaped water pipe. Inside the mouth is made of junk parts to create a jumble of mecha parts.
■ Mother Bio Armor
I sculpted it using Wave's "Lightweight Gray Epoxy Putty". Half of the work time was spent mixing the putty. My fingers hurt (Laughs).
■ Bio Zoid Core
I added details to the acrylic hemisphere with epoxy putty and installed electric lights to make it glow from within.
■ Death Scythe Rib
This one is also framed with plastic sheets and styrofoam, and sculpted with epoxy putty.
■ Painting
After spreading the entire thing with primer, I marbled it with yellow, red, and blue lacquire paints to create a background pattern. I then airbrushed the base color white on top. The key is to have the background pattern made with marbling remain faintly visible. If it creates an eerie atmosphere, then it's a success. To finish, I attached loose yarn to represent the veins.
Mother Bio is the Zoid that made my professional debut, so I have a lot of affection for it. I'm grateful to have had the opportunity to make it again.
- The characteristic large jaw is thicker than the modified Bio Tyranno version. The fangs are made from a prototype and then replicated in resin. (Left page, middle right)
- The base of the Bio Zoid Core. The heavy body is supported by a desk stand. This is truly the highlight of the Generations props. (Left page, middle center)
- The Death Scythe ribs alone are the same size as the modified Bio Tyranno version. The claw base is connected with Yellow Submarine's "Joint Lock". (Left page, middle left)
- The Bio Zoid Core is an acrylic hemisphere with epoxy putty for added details. it glows with electric lights inside. The pipe-like object seen in the center of the core is a mobile phone strap. (Left page, bottom right)
- The key to painting the armor is to make use of the background pattern created by spraying a primer on top and then marbling (a technique in which ink is dripped onto water and then scooped out with paper, etc.) (Left page, bottom left)
Bio Zoids "The Death"
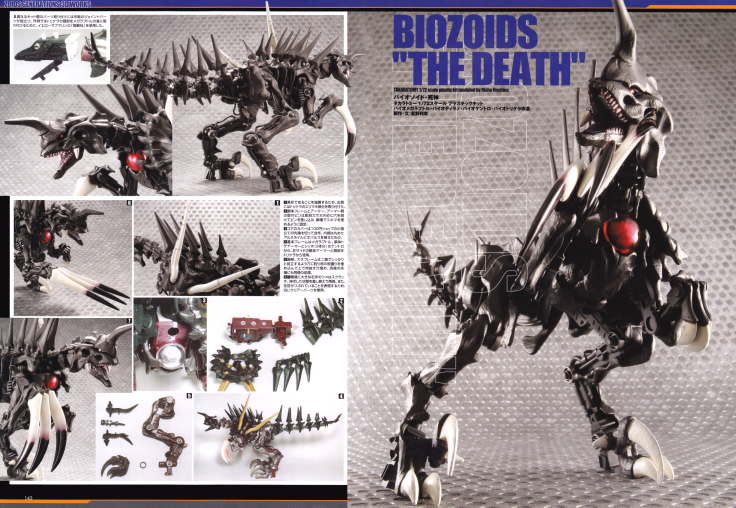
Bio Zoid - Reaper
Takara Tomy 1/72 Scale Plastic Kit
Modified Bio Megaraptor, Bio Tyranno, Bio Kentro, and Bio Tricera
Producer and Text: Tashiaki Hoshino
1: Commercially available joint parts are useful for attaching parts between different kits. In this example, I used Yellow Submarine's "Joint Technique" to attach the Triceratops head to the Megaraptor's neck.
2: To emphasize its unusual shape the Tricera's frill was attached to the left shoulder.
3: The torso frame and armor. The mounting pins on the armor side were made by drilling large holes with a carving knife, inserting the pins, and fixing them in place with instant glue to fill the gaps.
4: The core cover was made by cutting the tip off of a small object stand from a 100 yen shop. The inside is made by laminating rolled aluminum foil with opal.
5: The basic frame is a Megaraptor. The body spike armor and tail are from Kentro (two of them), and the left side body armor and head are from Tricera.
6~7: The legs. To make the shins of the two legs stand firmly, the holes were filled wisth fishing weights and the holes at the top were hollowed out then filled in. The tip of the tail was treated in the same fashion.
The extremely large claws on the right hand are scratch built. The extended claws were recreated with replacement part claws. Also, a white clear part was used to express that the left eye had been damaged.
■ Souga's arch enemy, the Bio Zoid known as the "Reaper" was made by combining parts from existing kits. After much struggle, this was the final result, with a focus on the initial appearance and how to separate it from existing Bio Zoids.
■ Here are some points to keep in mind when making a Bio Zoid...
■ Part of the Bio Zoid frame is made from polyacetal (POM), a material that's strong but not suitable for adhesive painting. In this example, "Cemedine PPX" (instant adhesive with primer for difficult-to-adhere materials) is used for the adhesion. For painting, the parts were roughed up with 600-grit sandpaper, then I sprayed on a thick layer of surfacer, and after that dried, put down another layer of surfacer. A rather aggressive method of smoothing the surface with paper was used to create the base.
■ The synthetic rubber used in Bio Zoid armor can be dissolved in Tamiya enamel thinner. Using this, the armor parts are scraped off a little using a sharp art knife, then rubbed with a cotton swab soaked in enamel thinner.
■ The synthetic rubber of the armor can be glued with instant adhesive. So you can use an art knife for scraping, then Alteco's instant adhesive putty for building it up.
■ The paint will adhere to the armor parts if you spray them with Creos Metal Primer before painting. However, be careful not to stretch the parts after painting, or they'll crack.
- The upper waist and upper thighs are made by combining armor from different kits. The necessary parts of the pieces were cut out and glued, then shaped with Alteco's Instant Adhesive Putty. (Right page, bottom right)
- In order to connect the evolved Reaper's wings, the slanted dorsal spike (right) has been changed to straighter ones (left) and the connecting parts have been remade. The Tricera frill from the left shoulder was also removed to make room for attaching the wings. (Right page, bottom left)
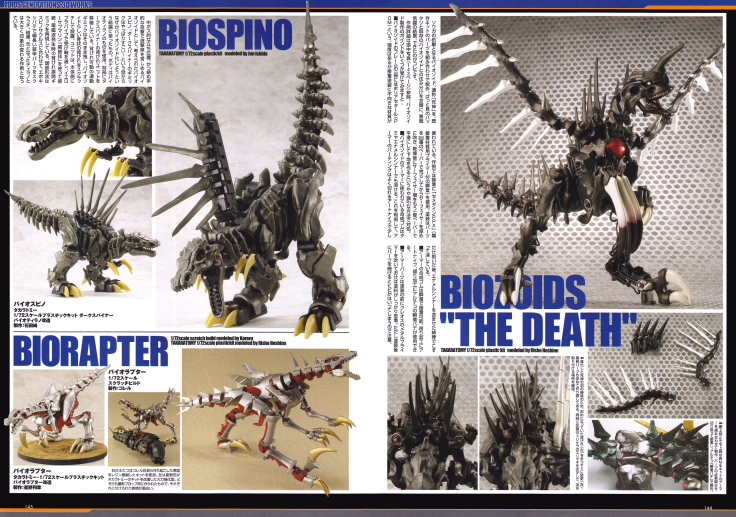
Bio Spino
Bio SpinoTakara Tomy 1/72 Scale Plastic Kit
Modified Dark Spiner / Bio Tyranno
Production: Shin Ishida
Bio Spino was conceived as a Bio Zoid that would torment the Commandos with its mid-boss-like attacks. The Dark Spiner gimmick was amazing, so for some reason we came to the conclusion that we should make it into a Bio Zoid. The body is from Bio Tyranno. The Dark Spiner's dorsal fin unit was transplanted onto the back. The movement gimmick from it was left as-is, and the bone-like dorsal spikes typical of Bio Zoids were scratch built and installed to it. The unit was connected to the main body with plastic pipe for the socket, and connected using Yellow Submarine's 'Joint Technique', recreating the dorsal spike deployment gimmick when electromagnetic waves are generated. The head shape was made to match a spinosaurus, and the long and thin armor parts were scratch built out of epoxy putty. As a result, it's an example that gives a very different impression from the original Tyranno.
Bio Raptor
Bio Raptor (Right)1/72 Scale Scratch Built
Made By: Corel
Bio Raptor (Left)
Takara Tomy 1/72 Scale Plastic Kit
Modified Bio Raptor
Made By: Toshiaki Hoshino
The two on the right are resin replicas of prototypes made by Corel himself. The one on the left is a firepower-enhanced version made by Hoshino by modifying the Takara Tomy kit. Both were made as photography props, and the facial expressions of each one are interesting.
Zoids Generations Related Products
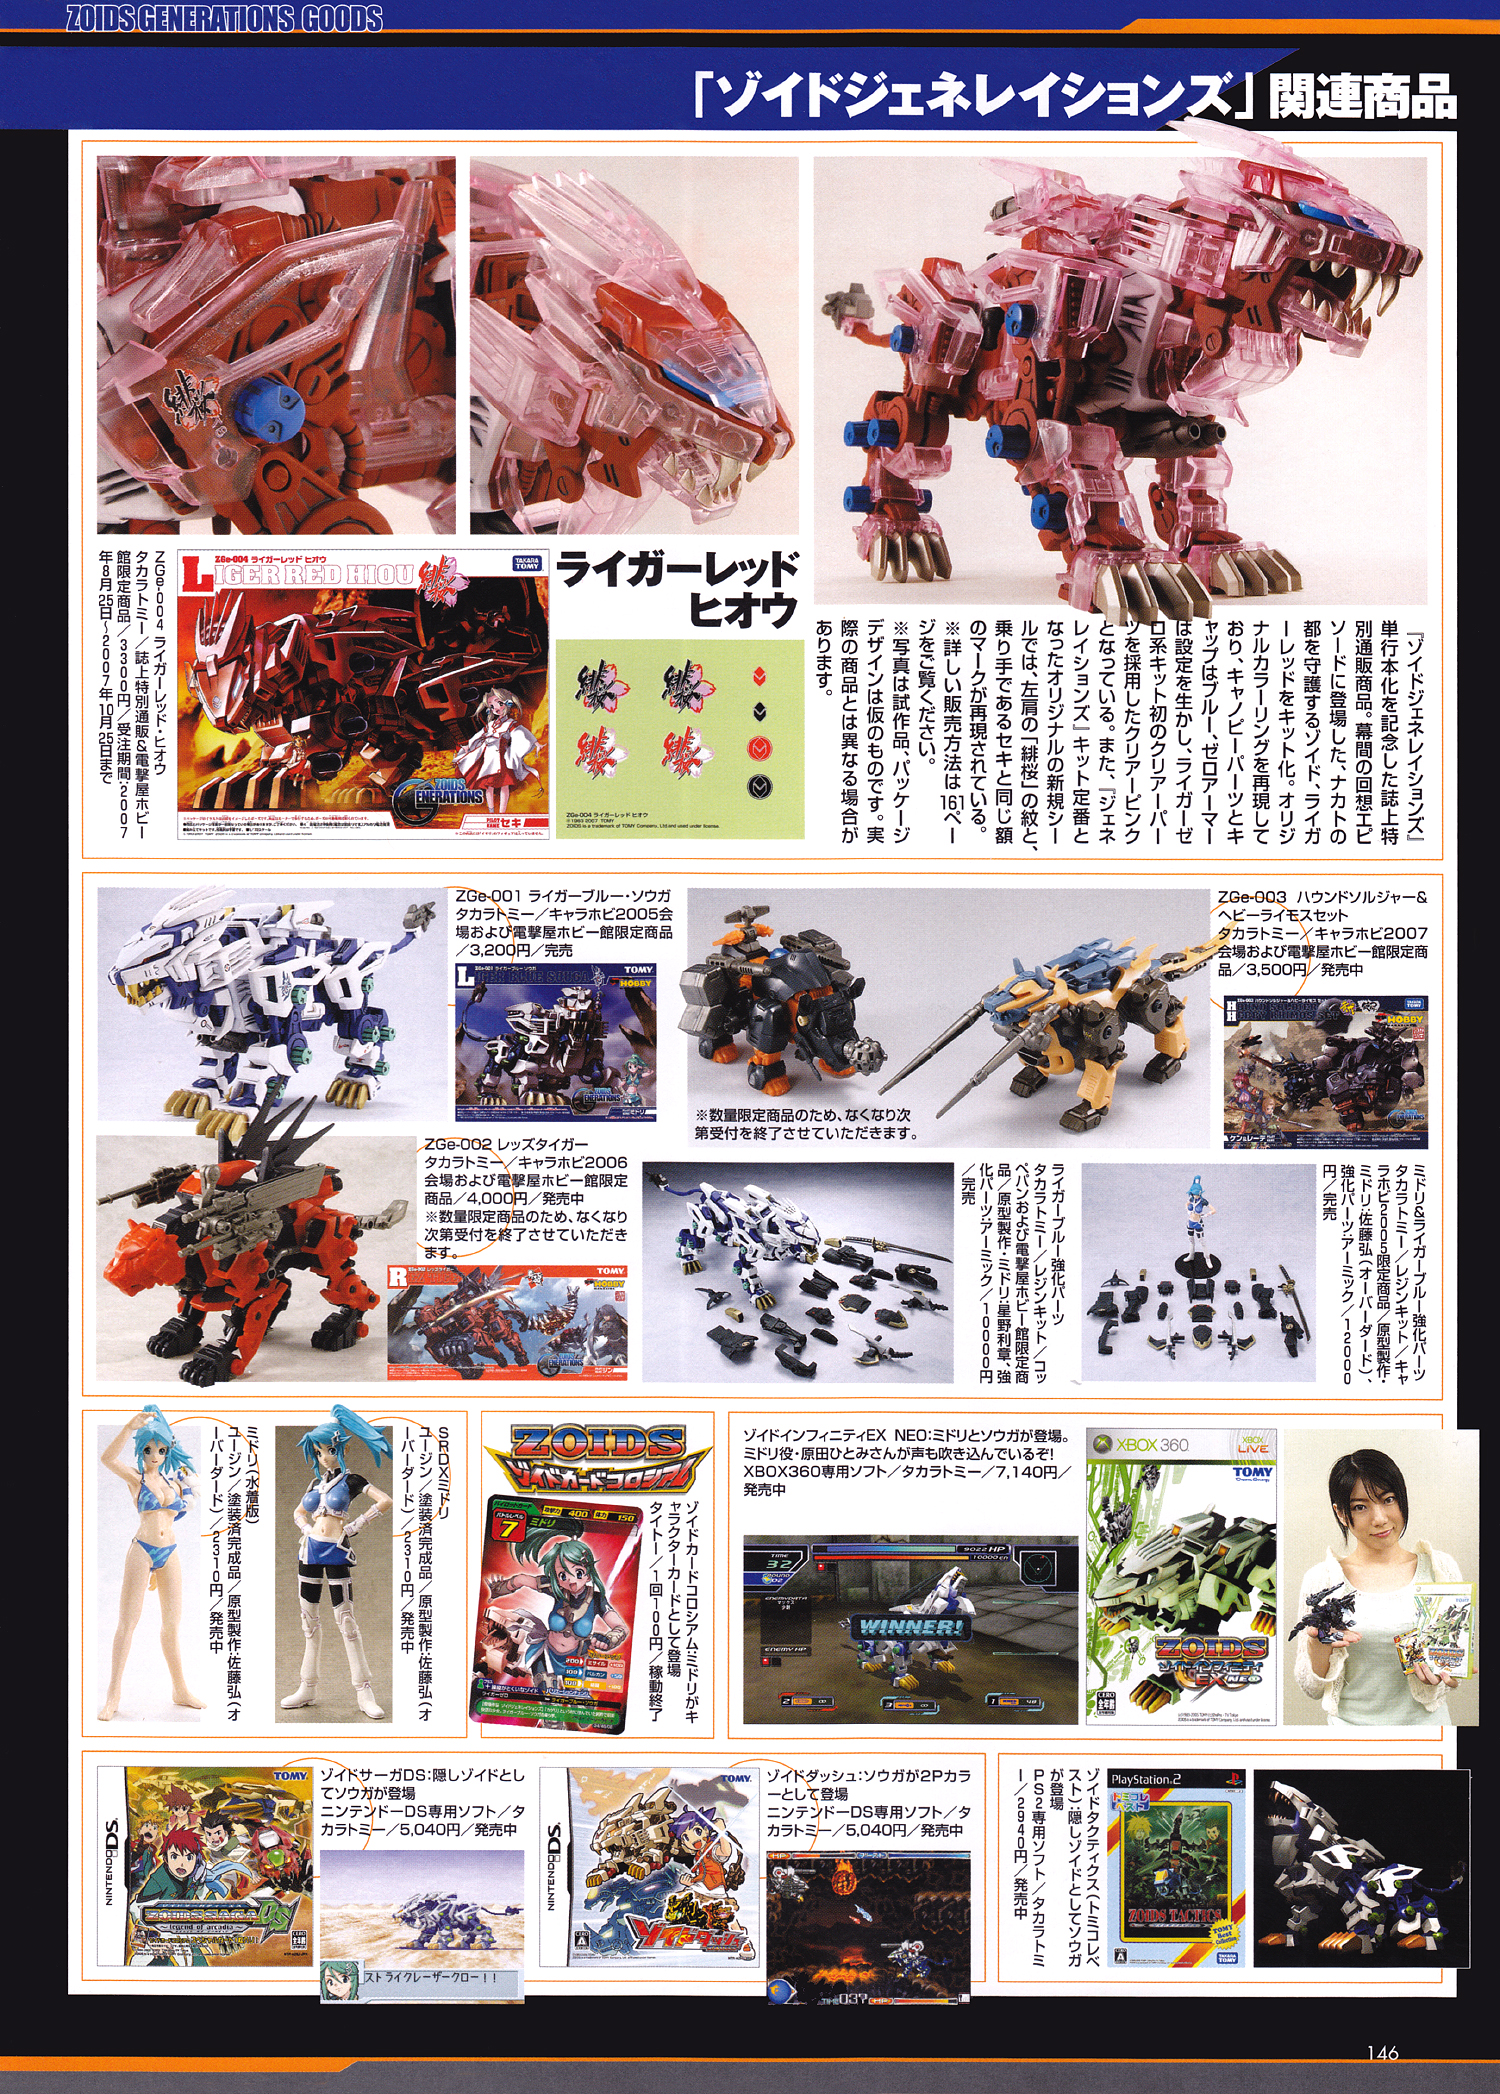
Here are the mail order products from the magazine to commemorate the publication o the Zoids Generations book. A kit of Liger Red, which appeared in the flashback episode between acts, and protected the city of Nakato. It reproduces the original coloring, with blue canopy parts and caps, and clear pink armor, which makes use of the Zero Armor and marks the first Liger Zero kit to use clear parts. In addition, the original new stickers, which have become a standard for Generations kits, reproduces the Hiou (Scarlet Charry Blossom) crest on the left shoulder and the mark on the forehead of its rider, Seki.
* The photo is a prototype and the package design is still provisional. The actual product may differ.
ZGe-004 Liger Red Hiou: Takara Tomy / Special Limited Mail Order Item from Dengeki Hobby Magazine & Dengeki Hobby Hall / 3300 Yen / Order Period: August 25, 2007 ~ October 25th, 2007
ZGe-003 Hound Soldier & Hebby Rhimos Set: Takara Tomy / Chara Hobby 2007 Venue and Dengeki Hobby Hall Limited Item / 3500 Yen / On Sale Now
Midori & Liger Blue Customize Parts: Takara Tomy / Resin Kit / Chara Hobby 2005 Limited Edition / Molded by Hiroshi Satou (Overdard) / Customize Parts by Armic / 12,000 Yen / Sold Out
Liger Blue Customize Parts: Takara Tomy / Resin Kit / Kotsupepan and Dengeki Hobby Hall Limited Edition / Molded by Toshiaki Hoshino * This is a limited edition product, so orders will close once stock runs out.
ZGe-001 Liger Blue Souga: Takara Tomy / Chara Hobby 2005 and Dengeki Hobby Hall Limited Edition / 3200 Yen / Sold Out
ZGe-002 Rez Tiger: Takara Tomy / Chara Hobby 2006 and Dengeki Hobby Hall Limited Edition / 4000 Yen / On Sale * This is a limited edition product, so orders will close once stock runs out.
Zoids Infinity EX NEO: Midori and Souga both appear in this game. Midori's voice is provided by Hitomi Harada! XBOX 360 exclusive software / Takara Tomy / 7140 Yen / On Sale Now
Zoids Card Coliseum: Midori appears as a character card. Taito 1/1 100 Yen per play / operation ended
SRDX Midori Yuji: Painted Finished Product / Sculpture: Hiroshi Satou (Overdard) / 2310 Yen / On Sale Now
Midori (Swimsuit Version) Yujin: Painted Finished Product / Sculptor: Hiroshi Satou (Overdard) / 2310 Yen / On Sale Now
Zoids Tactics (Tomy Collection Best): Souga appears as a hidden Zoid / PS2 Exclusive Software / Takara Tomy / 2940 Yen / On Sale Now
Zoids Dash: Souga appears as a 2P Color / Nintendo DS Exclusive Software / Takara Tomy / 5040 Yen / On Sale Now
Zoids Saga DS: Souga appears as a hidden Zoid / Nintendo DS Exclusive Software / Takara Tomy / 5040 Yen / On Sale Now
- Current Navigation


This book was translated using Google Translate. Please be aware that there will be errors! If you notice anything that needs corrected, feel free to contact us and let us know.
