
- Murasame Liger Conversion Kit
This unique resin kit was developed for the Murasame Liger in 2006, and is marked as the Tateishi Store Item #05. It is a resin kit (unpainted), used to convert the Murasame Liger into a posable model kit. For this reason, you can expect that you'll need a Murasame Kit to use for extra parts (necessity; not optional). If you can pick up a built one, I'd suggest it, since you'll be left with a husk, as it doesn't use the whole body. There's no need to use a MIB kit on this.
As an unpainted resin kit, this kit needs a lot of tender love and care to make it stand out. The kit involves trimming, potential molding and/or glue, and of course, paint. You may also need a power drill, depending on personal strength, since some of the screws are in pretty tight.
Due to the materials, the kit also stinks of spray paint, from extra compound coming off of the resin. Definitely give it a good wash with warm water to clean it up a bit.
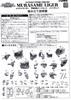
Instructions
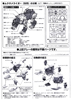
- Build Review
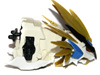
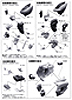
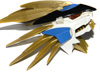
- Head
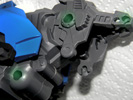
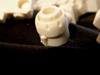
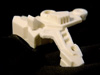
First things first. You're going to have to unscrew part of the Murasame Liger's body to get some pieces out. There are screws in the nose, cheek, and at the base of the throat (seen in image one). Once again, if you have a power drill, use it. It may be too large to use on the screw in the nose, but it should be fine for the others. The pieces you want to get are the eyes, the blue piece that makes up the lifting cockpit, the jaw, and the roof of the mouth (The jaw is attached to a pylon in the main body, so if it doesnt wanna budge, this is why). If you can't get them out, you may also need to unscrew the screw in the upper back (all screws are on the right side).
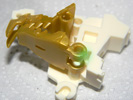
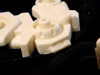
Once you've got the pieces out, the hook on the left jaw side needs to be cut off, and trimmed. This is indicated in the instructions, too (See image 2 for cut/trimmed example).
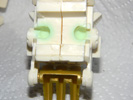
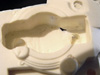
In the back of the head, there are two holes where you'll be attaching the black piece. These honestly are a bit deep, and don't fit with the pieces that'll attach to it. It'll stay on, though. If you need, use putty or glue. You'll also notice in the third picture that the two head pieces don't fit together very well. You can do some trimming to try to even it out, or use puddy to fill the gaps.

- Extra Flash
Regarding resin pieces, the Murasame Liger does indeed have some inadequacies. A couple of photos below show where some of the resin is uneven, or has bumps, etc. There'll be a lot of sanding and putty required to make these pieces perfectly smooth.
There's also some marbling on the flanks. I plan to smooth it out with modeling putty before painting the kit, but at first glance it's not nearly as bad as it looks in the photo.
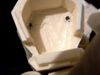
Now, the first image is where it's gonna start to get bad. This is inside the body, so thankfully the damage won't be visible when your kit is complete. I just wanted to point out that the areas where the resin is thin enough to sink through, but it's still not visible on the completed kit. These are in areas like the deep pits where the body connects.
The second image shows the ankle pieces. These are still unscrewed, but I'll cover that during the build review. The point here is that there's a thick bar of flash that needs to be trimmed on all pieces.
Third; the image is again, on the inside of the piece. This time it shows that the resin has punched through with holes.
The head area is a bit more annoying. You can even it out, but it won't look perfectly smooth without a little bit of putty to seal up those tiny notches. A small detail, but one that's been nagging at me.
At the end of this thumbnail list is the heels. This is on the back of both legs, but only on one half. It looks bad, so again, I'd commend shaving it. You'll notice a bit of marbling texture in some areas, too. This will require further sand/putty.
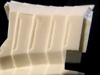
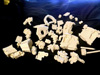
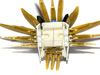
Last but not least, this image shows all of the pieces included in the kit. Over all, this Zoid is proving to be a challenge to put together, not just because of the pain of mixing and matching parts, but because a lot of them require customization or glue to attach at all.
- Head Armor
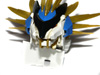
I've attached all of the armor to the head. Near the tip of the muzzle, you'll see that the armor really doesn't lay flat against it at all. I've poked around at that, but I can't see any obvious pieces to trim down to make it stick a little closer. The pieces do fall off, but they aren't completely loose, like some pieces.
Take notice that the plastic on the head, the two main pieces; do not lay flat either. This'll need to be fixed with putty. You can also see a hole in the right side of the nose, where there is normally a screw. You can stick the screw from the model kit back in, but it's not necessary to keep the head together, so just putty this one up, too.
- Attaching the Head and Neck
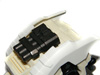
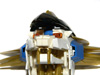
Moving on! The neck and torso of the Murasame Liger are all one piece. At the end of the neck, theres a two-pronged piece that fits into the holes in the back of the head (see above images). This isn't the tightest fit. It will stay on, but it couldn't hurt to glue it, and gluing it will not hinder the kit in any way. The back of the piece is a ball joint, that fits into the neck. In spite of this, the head ... actually ... doesn't have a very big range of motion.
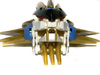
In the image with the chest gun (from the Murasame Liger kit; second image), you'll also see that there's a lot or flash at the base of the chest. This can be trimmed cleanly, though.
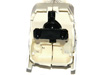
Image three shows the back of the torso, which has another two-pronged piece attached to the ball joint. This is where the center of the body attaches, but more on this will be covered in the next section.
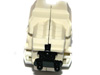
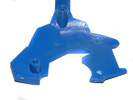
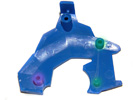
Image six shows the armor on the main body. This is kind of a pain. The white armor on the bottom of the chest doesn't attach very well. You might need to trim it just to get it to fit closely to the body at all, but it doesn't curve and conform properly to the main body.
The blue armor also does not. There's a lot of trimming involved in the blue pieces. Indicated in green, both of these pegs have to be completely shaved off. There is no hole for them on the Resin torso. Indicated in pink, this peg has to be trimmed down to about half it's length. You'll see in the image left of it that the peg is way too long for the shallow hole. Even after properly trimmed, the pieces do not have much traction for the hole, so if you just let it set, it will fall loose (seen in image six as well). Because these pieces are too loose, they were left off for most of the review.