


- Zoids VS III
Zoids VS III functions much the same as the former Zoids VS. games, but it does have some changes and some additions to the combat system, which will be explained below. I'll be looking at both the in-combat screen and some aspects that directly influence combat. Later on I'll probably continue to make guides for other Zoid-specific information.
- Basic Combat Screen
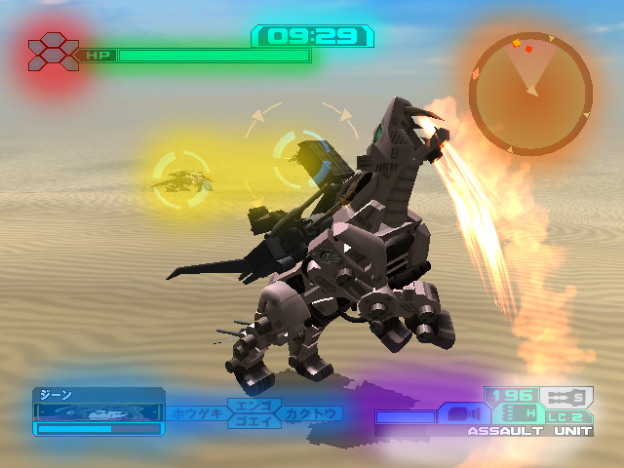
 Time - Usually every battle will consist of one round with a 10 minute time limit. Your remaining time is displayed at the top, and if it runs out you will automatically lose.
 Frame Condition - These five icons represent your Zoids body, head, and limbs. As you receive damage these will become 'damaged', and you will begin to notice sparks appearing on your Zoid to represent the condition that it's in.
 Hit Points - The life line of your Zoid. If this runs out, you lose.
 Radar - This radar will represent where each Zoid on the field is. Yellow dots are allies and red dots are enemies. There are two types of Radar, a close range Radar and a long range Radar. These use different upgrade parts. The close range radar can be increased in range. Similarly, the long range radar can be increased - as normally, if a Zoid is outside the radar you won't even see it on the map. The close range radar will also help you keep track of which direction you're facing.
 Enemies - When you have an enemy locked on you will see circles around them. If the circle is blue, this will mean that you have a confirmed lock on. Otherwise, it will be thin and green. While locked on you will always face the enemy; press L to release the lock on.
 Ally - This lower left section will show your ally if you have one. The bar shows their HP. I'm ... not entirely sure what the four markers are, but if your ally is becoming badly damaged, an image of the pilot will pop up. This will also happen if you shoot them. ... But you shouldn't shoot them. No matter how much you think you'd be better off without them.
 Option Part - Option Parts have limited use. This bar signifies how much energy they have remaining, and after use it must regenerate completely to be used again. The icon is simply what type of upgrade it is.
 Weapons - This section shows the different weapons that you have. The center icon has the secondary type, the upper right has the active type. and the upper left has the ammunition. Unlike in earlier games, Blade weapons also have an "ammunition" or energy limit that will not regenerate.
- Other Combat Notes
Battle Field - Most battle fields are expansive lands where you have room to roam freely, but every battle field has a limited space. When you near the edge of the battle field a warning error will appear at the top center of the screen, directing you back to the safe zone.
Death Zones - Select few battle fields have areas that you absolutely cannot touch. In Vs. Mode you will find holes in some arenas that will cause an automatic loss if you fall into them. On the Whale King battle field going over the edge of the transport unit will result in a loss (unless, of course, you have a flight unit).
Close Range Combat - Each Zoid has a different close range attack but generally these attacks are very powerful. The problem is, if you hit the button more than once, you will be unable to stop the attack until it is complete. Make sure that you are locked onto an enemy when striking, and never use it if you are right up against them, or you are likely to miss. Close range combat is used by pushing the C button.
Standard Weaponry - Every Zoid has a different number of weapon slots. You can access this from the Customize menu in between battles. Certain weapons have a straight forward firing and others, such as missiles, will seek out an opponent.
Blades can be used at close range by holding down the A button. Every Zoid can 'lock on' by pressing the R button, or cancel a lock by pressing L. Being locked on to an enemy will ensure that your camera will face them at all times. In most cases a lock on will show a green line, but when a blue circle appears you have a confirmed lock on the enemy.
Option Parts and Flight - Option parts come in several different types. Booster, Energy Shield, Smoke, Stealth, and Flight Unit. Boosters will increase speed and are excellent for dodging missiles. Energy Shields will protect you from some long range damage, but only at the front. However, if you rush an enemy it will be an automatic knock down (albeit with very little inflicted damage). Smoke will prevent an enemy from locking on. Stealth will make you invisible and will make it almost impossible for enemies to attack you, but it takes the longest to regenerate when exhausted.
Flight will be explained separately. It is a new feature, and while some Zoids come with automatic flight, and still an option for Option Parts (such as the Pteras and Storm Sworder), others can fly with access to a Flight Unit. Zoids like Energy Liger and Liger Zero Falcon gain this ability. To take flight use the main analog and the C stick. The main analog controls propulsion, while the C Stick controls ascent and descent. If you're using a flight unit you must hold the Z button to keep the Option Part running.
EX Attacks - In every Zoid is a specific, high powered weapon or attack that can be used in dire straights. When a Zoids HP has reached critical, an EX bar will appear above the HP. This bar becoming full will mean that you can use the EX attack if you hold down the A and X buttons. You must be completely still to initiate this attack, and it's best to use it with blades or something, so that it does not cause the Zoid to use a normal attack first.
